Program Arcade GamesWith Python And Pygame
Chapter 5: Introduction to Graphics
Now that you can create loops, it is time to move on to learning how to create graphics. This chapter covers:
- How the computer handles x, y coordinates. It isn't like the coordinate system you learned in math class.
- How to specify colors. With millions of colors to choose from, telling the computer what color to use isn't as easy as just saying “red.”
- How to open a blank window for drawing. Every artist needs a canvas.
- How to draw lines, rectangles, ellipses, and arcs.
5.1 Computer Coordinate Systems
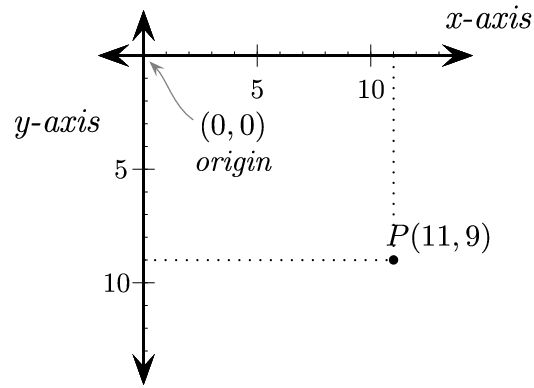
The Cartesian coordinate system, shown in
Figure 5.1 (Wikimedia Commons),
is the system most people are used to when plotting graphics. This is the system taught in school.
The computer uses a similar, but somewhat different, coordinate system. Understanding
why it is different requires a quick bit of computer history.

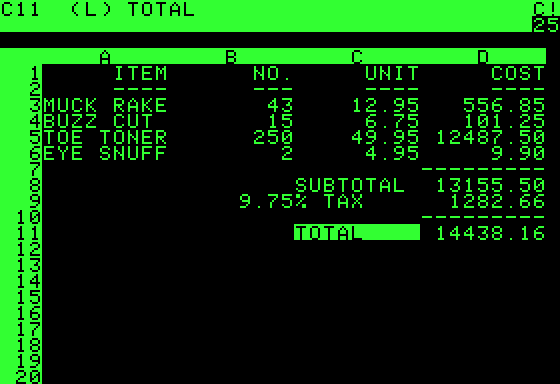
During the early '80s, most computer systems were text-based and did not support
graphics. Figure 5.2 (Wikimedia Commons)
shows an early spreadsheet program run on
an Apple ][ computer that was popular in the '80s. When positioning text on the screen, programmers started
at the top calling it line 1. The screen continued down for 24 lines and
across for 40 characters.
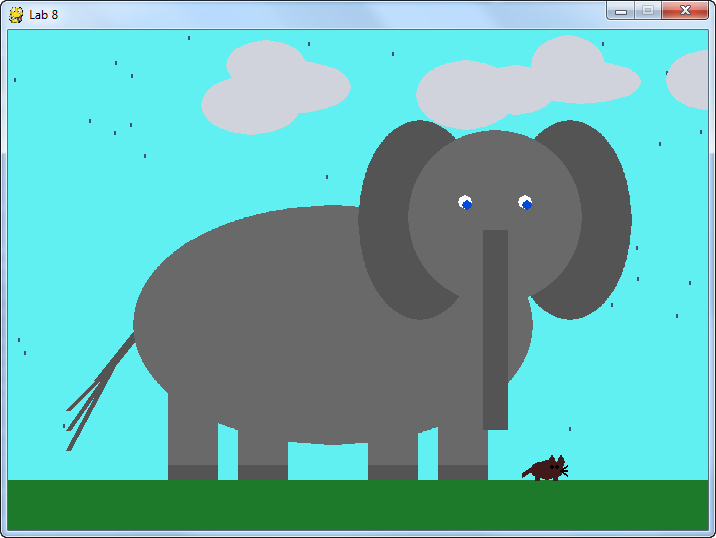
Even with plain text, it was possible to make rudimentary graphics by just using
characters on the keyboard. See this kitten shown in Figure 5.3 and look
carefully at how it is drawn. When making this art, characters
were still positioned starting with line 1 at the top.

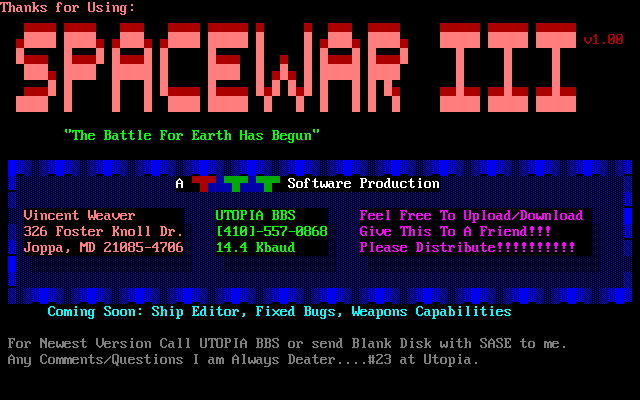
Later the character set was expanded to include boxes and other primitive drawing
shapes. Characters could be drawn in different colors. As shown in
Figure 5.4 the graphics got more advanced. Search the web for
“ASCII art” and many more examples can be found.
Once computers moved to being able to control individual pixels
for graphics, the text-based coordinate system stuck.
The $x$ coordinates work the same as the Cartesian coordinates system. But the $y$ coordinates are reversed. Rather than the zero $y$ coordinate at the bottom of the graph like in Cartesian graphics, the zero $y$ coordinate is at the top of the screen with the computer. As the $y$ values go up, the computer coordinate position moved down the screen, just like lines of text rather than standard Cartesian graphics. See Figure 5.5.
Also, note the screen covers the lower right quadrant, where the Cartesian coordinate system usually focuses on the upper right quadrant. It is possible to draw items at negative coordinates, but they will be drawn off-screen. This can be useful when part of a shape is off screen. The computer figures out what is off-screen and the programmer does not need to worry too much about it.
5.2 Pygame Library
To make graphics easier to work with, we'll use “Pygame.” Pygame is a library of code other people have written, and makes it simple to:
- Draw graphic shapes
- Display bitmapped images
- Animate
- Interact with keyboard, mouse, and gamepad
- Play sound
- Detect when objects collide
The first code a Pygame program needs to do is load and initialize the Pygame library. Every program that uses Pygame should start with these lines:
# Import a library of functions called 'pygame'
import pygame
# Initialize the game engine
pygame.init()
If you haven't installed Pygame yet, directions for installing Pygame are available in the before you begin section. If Pygame is not installed on your computer, you will get an error when trying to run import pygame.
Important: The import pygame looks for a library file named pygame. If a programmer creates a new program named pygame.py, the computer will import that file instead! This will prevent any pygame programs from working until that pygame.py file is deleted.
5.3 Colors
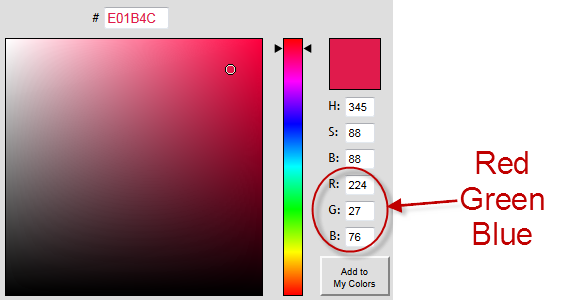
Next, we need to add variables that define our program's colors. Colors are defined in a list of three colors: red, green, and blue. Have you ever heard of an RGB monitor? This is where the term comes. Red-Green-Blue. With older monitors, you could sit really close to the monitor and make out the individual RGB colors. At least before your mom told you not to sit so close to the TV. This is hard to do with today's high resolution monitors.
Each element of the RGB triad is a number ranging from 0 to 255. Zero means there is none of the color, and 255 tells the monitor to display as much of the color as possible. The colors combine in an additive way, so if all three colors are specified, the color on the monitor appears white. (This is different than how ink and paint work.)
Lists in Python are surrounded by either square brackets or parentheses. (Chapter 7 covers lists in detail and the difference between the two types.) Individual numbers in the list are separated by commas. Below is an example that creates variables and sets them equal to lists of three numbers. These lists will be used later to specify colors.
# Define some colors
BLACK    = (   0,   0,   0)
WHITE    = ( 255, 255, 255)
GREEN    = (   0, 255,   0)
RED      = ( 255,   0,   0)
BLUE     = (   0,   0, 255)
Why are these variables in upper-case? Remember back from chapter one, a variable that doesn't change is called a constant. We don't expect the color of black to change; it is a constant. We signify that variables are constants by naming them with all upper-case letters. If we expect a color to change, like if we have sky_color that changes as the sun sets, then that variable would be in all lower-case letters.
Using the interactive shell in IDLE, try defining these variables and printing them
out.
If the five colors above aren't the colors you are looking for, you can define your
own. To pick a color, find an on-line “color picker” like the one shown in
Figure 5.6. One such color picker is at:
http://www.colorpicker.com/
Extra: Some color pickers specify colors in hexadecimal. You can enter hexadecimal numbers if you start them with 0x. For example:
WHITE = (0xFF, 0xFF, 0xFF)
Eventually the program will need to use the value of $\pi$ when drawing arcs, so this is a good time in our program to define a variable that contains the value of $\pi$. (It is also possible to import this from the math library as math.pi.)
PI = 3.141592653
5.4 Open a Window
So far, the programs we have created only printed text out to the screen. Those programs did not open any windows like most modern programs do. The code to open a window is not complex. Below is the required code, which creates a window sized to a width of 700 pixels, and a height of 500:
size = (700, 500)
screen = pygame.display.set_mode(size)
Why set_mode? Why not open_window? The reason is that this command can actually do a lot more than open a window. It can also create games that run in a full-screen mode. This removes the start menu, title bars, and gives the game control of everything on the screen. Because this mode is slightly more complex to use, and most people prefer windowed games anyway, we'll skip a detailed discussion on full-screen games. But if you want to find out more about full-screen games, check out the documentation on pygame's display command.
Also, why size = (700, 500) and not size = 700, 500? The same reason why we put parentheses around the color definitions. Python can't normally store two numbers (a height and width) into one variable. The only way it can is if the numbers are stored as a list. Lists need either parentheses or square brackets. (Technically, parenthesis surrounding a set of numbers is more accurately called a tuple or an immutable list. Lists surrounded by square brackets are just called lists. An experienced Python developer would cringe at calling a list of numbers surrounded by parentheses a list rather than a tuple. Also you can actually say size = 700, 500 and it will default to a tuple but I prefer to use parentheses.) Lists are covered in detail in Chapter 7.
To set the title of the window (which is shown in the title bar) use the following line of code:
pygame.display.set_caption("Professor Craven's Cool Game")
5.5 Interacting With the User
With just the code written so far, the program would create a window and immediately hang. The user can't interact with the window, even to close it. All of this needs to be programmed. Code needs to be added so that the program waits in a loop until the user clicks “exit.”
This is the most complex part of the program, and a complete understanding of it isn't needed yet. But it is necessary to have an idea of what it does, so spend some time studying it and asking questions.
# Loop until the user clicks the close button.
done = False

# Used to manage how fast the screen updates
clock = pygame.time.Clock()

# -------- Main Program Loop -----------
while not done:
    # --- Main event loop
    for event in pygame.event.get(): # User did something
        if event.type == pygame.QUIT: # If user clicked close
            done = True # Flag that we are done so we exit this loop

    # --- Game logic should go here

    # --- Drawing code should go here

    # First, clear the screen to white. Don't put other drawing commands
    # above this, or they will be erased with this command.
    screen.fill(WHITE)

    # --- Go ahead and update the screen with what we've drawn.
    pygame.display.flip()

    # --- Limit to 60 frames per second
    clock.tick(60)
Eventually we will add code to handle the keyboard and mouse clicks. That code will go below the comment for main event loop on line 9. Code for determining when bullets are fired and how objects move will go below the comment for game logic on line 14. We'll talk about that in later chapters. Code to draw will go in below where the screen is filled with white on line 20.
5.5.1 The Event Processing Loop
Alert! One of the most frustrating problems programmers have is to mess up the event processing loop. This “event processing” code handles all the keystrokes, mouse button clicks, and several other types of events. For example your loop might look like:
    for event in pygame.event.get():
        if event.type == pygame.QUIT:
            print("User asked to quit.")
        elif event.type == pygame.KEYDOWN:
            print("User pressed a key.")
        elif event.type == pygame.KEYUP:
            print("User let go of a key.")
        elif event.type == pygame.MOUSEBUTTONDOWN:
            print("User pressed a mouse button")
The events (like pressing keys) all go together in a list. The program uses a for loop to loop through each event. Using a chain of if statements the code figures out what type of event occurred, and the code to handle that event goes in the if statement.
All the if statements should go together, in one for loop. A common mistake when doing copy and pasting of code is to not merge loops from two programs, but to have two event loops.
    # Here is one event loop
    for event in pygame.event.get():
        if event.type == pygame.QUIT:
            print("User asked to quit.")
        elif event.type == pygame.KEYDOWN:
            print("User pressed a key.")
        elif event.type == pygame.KEYUP:
            print("User let go of a key.")

    # Here the programmer has copied another event loop
    # into the program. This is BAD. The events were already
    # processed.
    for event in pygame.event.get():
        if event.type == pygame.QUIT:
            print("User asked to quit.")
        elif event.type == pygame.MOUSEBUTTONDOWN:
            print("User pressed a mouse button")
The for loop on line 2 grabbed all of the user events. The for loop on line 13 won't grab any events because they were already processed in the prior loop.
Another typical problem is to start drawing, and then try to finish the event loop:
    for event in pygame.event.get():
        if event.type == pygame.QUIT:
            print("User asked to quit.")
        elif event.type == pygame.KEYDOWN:
            print("User pressed a key.")


    pygame.draw.rect(screen, GREEN, [50,50,100,100])

    # This is code that processes events. But it is not in the
    # 'for' loop that processes events. It will not act reliably.
    if event.type == pygame.KEYUP:
        print("User let go of a key.")
    elif event.type == pygame.MOUSEBUTTONDOWN:
        print("User pressed a mouse button")
This will cause the program to ignore some keyboard and mouse commands. Why? The for loop processes all the events in a list. So if there are two keys that are hit, the for loop will process both. In the example above, the if statements are not in the for loop. If there are multiple events, the if statements will only run for the last event, rather than all events.
5.5.2 Processing Each Frame
The basic logic and order for each frame of the game:
- While not done:
- For each event (keypress, mouse click, etc.):
- Use a chain of if statements to run code to handle each event.
- Run calculations to determine where objects move, what happens when objects collide, etc.
- Clear the screen
- Draw everything
- For each event (keypress, mouse click, etc.):
It makes the program easier to read and understand if these steps aren't mixed togther. Don't do some calculations, some drawing, some more calculations, some more drawing. Also, see how this is similar to the calculator done in chapter one. Get user input, run calculations, and output the answer. That same pattern applies here.
The code for drawing the image to the screen happens inside the while loop. With the clock tick set at 10, the contents of the window will be drawn 10 times per second. If it happens too fast the computer is sluggish because all of its time is spent updating the screen. If it isn't in the loop at all, the screen won't redraw properly. If the drawing is outside the loop, the screen may initially show the graphics, but the graphics won't reappear if the window is minimized, or if another window is placed in front.
5.6 Ending the Program
Right now, clicking the “close” button of a window while running this Pygame program in IDLE will still cause the program to crash. This is a hassle because it requires a lot of clicking to close a crashed program.
The problem is, even though the loop has exited, the program hasn't told the computer to close the window. By calling the command below, the program will close any open windows and exit as desired.
pygame.quit()
5.7 Clearing the Screen
The following code clears whatever might be in the window with a white background. Remember that the variable WHITE was defined earlier as a list of 3 RGB values.
# Clear the screen and set the screen background
screen.fill(WHITE)
This should be done before any drawing command is issued. Clearing the screen after the program draws graphics results in the user only seeing a blank screen.
When a window is first created it has a black background. It is still important to clear the screen because there are several things that could occur to keep this window from starting out cleared. A program should not assume it has a blank canvas to draw on.
5.8 Flipping the Screen
Very important! You must flip the display after you draw. The computer will not display the graphics as you draw them because it would cause the screen to flicker. This waits to display the screen until the program has finished drawing. The command below “flips” the graphics to the screen.
Failure to include this command will mean the program just shows a blank screen. Any drawing code after this flip will not display.
# Go ahead and update the screen with what we've drawn.
pygame.display.flip()
5.9 Open a Blank Window
Let's bring everything we've talked about into one full program. This code can be used as a base template for a Pygame program. It opens up a blank window and waits for the user to press the close button.
On the website, if you click the “Examples” button you can select “graphics examples” and then you will find this file as pygame_base_template.py.
"""
 Pygame base template for opening a window

 Sample Python/Pygame Programs
 Simpson College Computer Science
 http://programarcadegames.com/
 http://simpson.edu/computer-science/

 Explanation video: http://youtu.be/vRB_983kUMc
"""

import pygame

# Define some colors
BLACK = (0, 0, 0)
WHITE = (255, 255, 255)
GREEN = (0, 255, 0)
RED = (255, 0, 0)

pygame.init()

# Set the width and height of the screen [width, height]
size = (700, 500)
screen = pygame.display.set_mode(size)

pygame.display.set_caption("My Game")

# Loop until the user clicks the close button.
done = False

# Used to manage how fast the screen updates
clock = pygame.time.Clock()

# -------- Main Program Loop -----------
while not done:
    # --- Main event loop
    for event in pygame.event.get():
        if event.type == pygame.QUIT:
            done = True

    # --- Game logic should go here

    # --- Screen-clearing code goes here

    # Here, we clear the screen to white. Don't put other drawing commands
    # above this, or they will be erased with this command.

    # If you want a background image, replace this clear with blit'ing the
    # background image.
    screen.fill(WHITE)

    # --- Drawing code should go here

    # --- Go ahead and update the screen with what we've drawn.
    pygame.display.flip()

    # --- Limit to 60 frames per second
    clock.tick(60)

# Close the window and quit.
pygame.quit()
5.10 Drawing Introduction
Here is a list of things that you can draw:
http://www.pygame.org/docs/ref/draw.html
A program can draw things like rectangles, polygons, circles, ellipses, arcs, and lines. We
will also cover how to display text with graphics. Bitmapped graphics such as images are covered in
Chapter 11.
If you decide to look at that pygame reference, you might see a function definition like this:
pygame.draw.rect(Surface, color, Rect, width=0): return Rect
A frequent cause of confusion is the part of the line that says width=0. What this means is that if you do not supply a width, it will default to zero. Thus this function call:
pygame.draw.rect(screen, RED, [55, 50, 20, 25])
Is the same as this function call:
pygame.draw.rect(screen, RED, [55, 50, 20, 25], 0)
The : return Rect is telling you that the function returns a rectangle, the same one that was passed in. You can just ignore this part.
What will not work, is attempting to copy the line and put width = 0 in the parentheses.
# This fails and the error the computer gives you is
# really hard to understand.
pygame.draw.rect(screen, RED, [55, 50, 20, 25], width=0)
5.11 Drawing Lines
The code example below shows how to draw a line on the screen. It will draw on the screen a green line from (0, 0) to (100, 100) that is 5 pixels wide. Remember that GREEN is a variable that was defined earlier as a list of three RGB values.
# Draw on the screen a green line from (0, 0) to (100, 100)
# that is 5 pixels wide.
pygame.draw.line(screen, GREEN, [0, 0], [100, 100], 5)
Use the base template from the prior example and add the code to draw lines. Read the comments to figure out exactly where to put the code. Try drawing lines with different thicknesses, colors, and locations. Draw several lines.
5.12 Drawing Lines With Loops and Offsets
Programs can repeat things over and over. The next code example draws a line over and over using a loop. Programs can use this technique to do multiple lines, and even draw an entire car.
Putting a line drawing command inside a loop will cause multiple lines being drawn to the screen. But here's the catch. If each line has the same starting and ending coordinates, then each line will draw on top of the other line. It will look like only one line was drawn.
To get around this, it is necessary to offset the coordinates each time through the loop. So the first time through the loop the variable y_offset is zero. The line in the code below is drawn from (0,10) to (100, 110). The next time through the loop y_offset increased by 10. This causes the next line to be drawn to have new coordinates of (0, 20) and (100, 120). This continues each time through the loop shifting the coordinates of each line down by 10 pixels.
# Draw on the screen several lines from (0, 10) to (100, 110)
# 5 pixels wide using a while loop
y_offset = 0
while y_offset < 100:
    pygame.draw.line(screen,RED,[0,10+y_offset],[100,110+y_offset],5)
    y_offset = y_offset + 10
This same code could be done even more easily with a for loop:
# Draw on the screen several lines from (0,10) to (100,110)
# 5 pixels wide using a for loop
for y_offset in range(0, 100, 10):
    pygame.draw.line(screen,RED,[0,10+y_offset],[100,110+y_offset],5)
Run this code and try using different changes to the offset. Try creating an offset with different values. Experiment with different values until exactly how this works is obvious.
For example, here is a loop that uses sine and cosine to create a more complex set of offsets and produces the image shown in Figure 5.7.
# For this code, make sure to have a line that says
# "import math" at the top of your program. Otherwise
# it won't know what math.sin is.

for i in range(200):

	radians_x = i / 20
	radians_y = i / 6

	x = int(75 * math.sin(radians_x)) + 200
	y = int(75 * math.cos(radians_y)) + 200

	pygame.draw.line(screen, BLACK, [x,y], [x+5,y], 5)

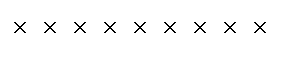
Multiple elements can be drawn in one for loop, such as this code which draws the multiple X's shown in Figure 5.8.
    for x_offset in range(30, 300, 30):
        pygame.draw.line(screen,BLACK,[x_offset,100],[x_offset-10,90],2)
        pygame.draw.line(screen,BLACK,[x_offset,90],[x_offset-10,100],2)
5.13 Drawing a Rectangle
When drawing a rectangle, the computer needs coordinates for the upper left rectangle corner (the origin), and a height and width.
Figure 5.9 shows a rectangle
(and an ellipse, which will be explained later) with the origin at
(20, 20), a width of 250 and a height of 100. When specifying a rectangle
the computer needs a list of these four numbers in the order of (x, y, width, height).
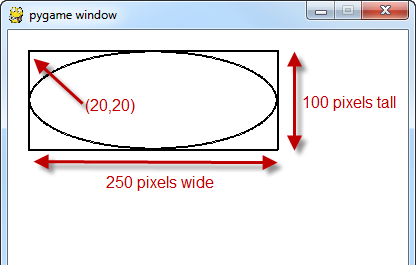
The next code example draws this rectangle. The first two numbers in the list define the upper left corner at (20, 20). The next two numbers specify first the width of 250 pixels, and then the height of 100 pixels.
The 2 at the end specifies a line width of 2 pixels. The larger the number, the thicker the line around the rectangle. If this number is 0, then there will not be a border around the rectangle. Instead it will be filled in with the color specified.
# Draw a rectangle
pygame.draw.rect(screen,BLACK,[20,20,250,100],2)
5.14 Drawing an ellipse
An ellipse is drawn just like a rectangle. The boundaries of a rectangle are specified, and the computer draws an ellipses inside those boundaries.
The most common mistake in working with an ellipse is to think that the starting point specifies the center of the ellipse. In reality, nothing is drawn at the starting point. It is the upper left of a rectangle that contains the ellipse.
Looking back at Figure 5.9 one can see an ellipse 250 pixels wide and 100 pixels tall. The upper left corner of the 250x100 rectangle that contains it is at (20, 20). Note that nothing is actually drawn at (20, 20). With both drawn on top of each other it is easier to see how the ellipse is specified.
# Draw an ellipse, using a rectangle as the outside boundaries
pygame.draw.ellipse(screen, BLACK, [20,20,250,100], 2)
5.15 Drawing an Arc
What if a program only needs to draw part of an ellipse? That can be
done with the arc command. This command is similar to the
ellipse command,
but it includes start and end angles for the arc to be drawn. The angles
are in radians.
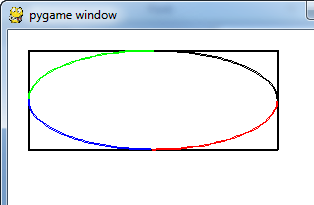
The code example below draws four arcs showing four difference quadrants of the circle. Each quadrant is drawn in a different color to make the arcs sections easier to see. The result of this code is shown in Figure 5.10.
# Draw an arc as part of an ellipse. Use radians to determine what
# angle to draw.
pygame.draw.arc(screen, GREEN, [100,100,250,200],  PI/2,     PI, 2)
pygame.draw.arc(screen, BLACK, [100,100,250,200],     0,   PI/2, 2)
pygame.draw.arc(screen, RED,   [100,100,250,200],3*PI/2,   2*PI, 2)
pygame.draw.arc(screen, BLUE,  [100,100,250,200],    PI, 3*PI/2, 2)
5.16 Drawing a Polygon
The next line of code draws a polygon. The triangle shape
is defined with three points
at (100, 100) (0, 200) and (200, 200). It is possible to list as
many points as desired. Note how the points are listed. Each point
is a list of two numbers, and the points themselves are nested in
another list that holds all the points. This code draws what can be
seen in Figure 5.11.
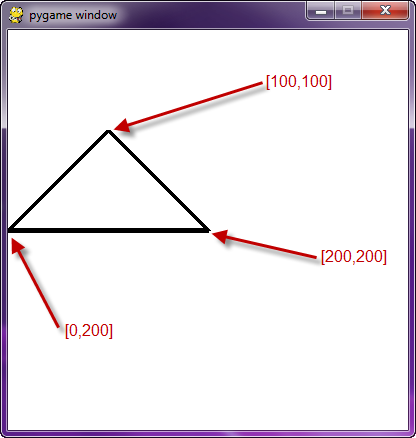
# This draws a triangle using the polygon command
pygame.draw.polygon(screen, BLACK, [[100,100], [0,200], [200,200]], 5)
5.17 Drawing Text
Text is slightly more complex. There are three things that need to be done. First, the program creates a variable that holds information about the font to be used, such as what typeface and how big.
Second, the program creates an image of the text. One way to think of it is that the program carves out a “stamp” with the required letters that is ready to be dipped in ink and stamped on the paper.
The third thing that is done is the program tells where this image of the text should be stamped (or “blit'ed”) to the screen.
Here's an example:
# Select the font to use, size, bold, italics
font = pygame.font.SysFont('Calibri', 25, True, False)

# Render the text. "True" means anti-aliased text.
# Black is the color. The variable BLACK was defined
# above as a list of [0, 0, 0]
# Note: This line creates an image of the letters,
# but does not put it on the screen yet.
text = font.render("My text",True,BLACK)

# Put the image of the text on the screen at 250x250
screen.blit(text, [250, 250])
Want to print the score to the screen? That is a bit more complex. This does not work:
text = font.render("Score: ", score, True, BLACK)
Why? A program can't just add extra items to font.render like the print statement. Only one string can be sent to the command, therefore the actual value of score needs to be appended to the “Score: ” string. But this doesn't work either:
text = font.render("Score: " + score, True, BLACK)
If score is an integer variable, the computer doesn't know how to add it to a string. You, the programmer, must convert the score to a string. Then add the strings together like this:
text = font.render("Score: " + str(score), True, BLACK)
Now you know how to print the score. If you want to print a
timer, that requires print formatting, discussed in a chapter later on.
Check in the example code for
section on-line for the timer.py example:
ProgramArcadeGames.com/python_examples/f.php?file=timer.py
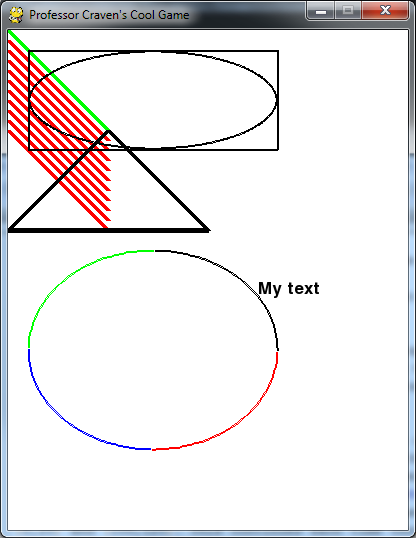
5.18 Full Program Listing
This is a full listing of the program discussed in this chapter. This program,
along with other programs, may be downloaded from:
ProgramArcadeGames.com/index.php?chapter=example_code
"""
 Simple graphics demo

 Sample Python/Pygame Programs
 Simpson College Computer Science
 http://programarcadegames.com/
 http://simpson.edu/computer-science/

"""

# Import a library of functions called 'pygame'
import pygame

# Initialize the game engine
pygame.init()

# Define some colors
BLACK = (0, 0, 0)
WHITE = (255, 255, 255)
BLUE = (0, 0, 255)
GREEN = (0, 255, 0)
RED = (255, 0, 0)

PI = 3.141592653

# Set the height and width of the screen
size = (400, 500)
screen = pygame.display.set_mode(size)

pygame.display.set_caption("Professor Craven's Cool Game")

# Loop until the user clicks the close button.
done = False
clock = pygame.time.Clock()

# Loop as long as done == False
while not done:

    for event in pygame.event.get():  # User did something
        if event.type == pygame.QUIT:  # If user clicked close
            done = True  # Flag that we are done so we exit this loop

    # All drawing code happens after the for loop and but
    # inside the main while not done loop.

    # Clear the screen and set the screen background
    screen.fill(WHITE)

    # Draw on the screen a line from (0,0) to (100,100)
    # 5 pixels wide.
    pygame.draw.line(screen, GREEN, [0, 0], [100, 100], 5)

    # Draw on the screen several lines from (0,10) to (100,110)
    # 5 pixels wide using a loop
    for y_offset in range(0, 100, 10):
        pygame.draw.line(screen, RED, [0, 10 + y_offset], [100, 110 + y_offset], 5)


    # Draw a rectangle
    pygame.draw.rect(screen, BLACK, [20, 20, 250, 100], 2)

    # Draw an ellipse, using a rectangle as the outside boundaries
    pygame.draw.ellipse(screen, BLACK, [20, 20, 250, 100], 2)

    # Draw an arc as part of an ellipse.
    # Use radians to determine what angle to draw.
    pygame.draw.arc(screen, BLACK, [20, 220, 250, 200], 0, PI / 2, 2)
    pygame.draw.arc(screen, GREEN, [20, 220, 250, 200], PI / 2, PI, 2)
    pygame.draw.arc(screen, BLUE, [20, 220, 250, 200], PI, 3 * PI / 2, 2)
    pygame.draw.arc(screen, RED, [20, 220, 250, 200], 3 * PI / 2, 2 * PI, 2)

    # This draws a triangle using the polygon command
    pygame.draw.polygon(screen, BLACK, [[100, 100], [0, 200], [200, 200]], 5)

    # Select the font to use, size, bold, italics
    font = pygame.font.SysFont('Calibri', 25, True, False)

    # Render the text. "True" means anti-aliased text.
    # Black is the color. This creates an image of the
    # letters, but does not put it on the screen
    text = font.render("My text", True, BLACK)

    # Put the image of the text on the screen at 250x250
    screen.blit(text, [250, 250])

    # Go ahead and update the screen with what we've drawn.
    # This MUST happen after all the other drawing commands.
    pygame.display.flip()

    # This limits the while loop to a max of 60 times per second.
    # Leave this out and we will use all CPU we can.
    clock.tick(60)

# Be IDLE friendly
pygame.quit()
5.19 Review
5.19.1 Multiple Choice Quiz
Click here for a multiple-choice quiz.
5.19.2 Short Answer Worksheet
Click here for the chapter worksheet.
5.19.3 Lab
Click here for the chapter lab.
English version by Paul Vincent Craven
Spanish version by Antonio Rodríguez Verdugo
Russian version by Vladimir Slav
Turkish version by Güray Yildirim
Portuguese version by Armando Marques Sobrinho and Tati Carvalho
Dutch version by Frank Waegeman
Hungarian version by Nagy Attila
Finnish version by Jouko Järvenpää
French version by Franco Rossi
Korean version by Kim Zeung-Il
Chinese version by Kai Lin