Program Arcade GamesWith Python And Pygame
Chapter 8: Introduction to Animation
8.1 The Bouncing Rectangle
To begin our first animation, let's start with the base pygame program from Chapter 5 that opens
up a blank screen. Source for pygame_base_template.py can be found here:
ProgramArcadeGames.com/python_examples/f.php?file=pygame_base_template.py
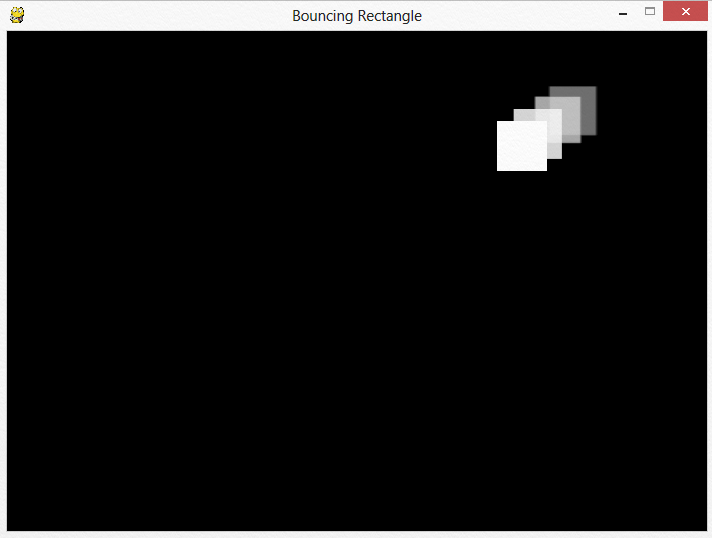
We will put together a program to bounce a white rectangle around a screen with
a black background. Feel free to pick your own colors, just make
sure the background color is different than the rectangle color!
First step, start with the base template and flip the background color from white to black. This code should be around line 46.
screen.fill(BLACK)
Next up, draw the rectangle we plan to animate. A simple rectangle will suffice. This code should be placed after clearing the screen, and before flipping it.
pygame.draw.rect(screen, WHITE, [50, 50, 50, 50])
Each time through the loop the rectangle will be drawn at an (x,y) location of exactly (50,50). This is controlled by the first two 50s in the list. Until those numbers change, the square will not move.
The rectangle will be 50 pixels wide and 50 pixels tall. The dimensions are controlled by the last two numbers in the list. We could also call this rectangle a square, since it has the same width and height. I'll stick with calling it a rectangle because all squares are also rectangles, and depending on the monitor and resolution used, pixels aren't always square. Look up Pixel Aspect Ratio if you are really interested in this subject.
How do we keep changing the location rather than have it stuck at (50, 50)? Use a variable, of course! The code below is a first step towards that:
rect_x = 50
pygame.draw.rect(screen, WHITE, [rect_x, 50, 50, 50])
To move the rectangle to the right, x can be increased by one each frame. This code is close, but it does not quite do it:
rect_x = 50
pygame.draw.rect(screen, WHITE, [rect_x, 50, 50, 50])
rect_x += 1
The problem with the above code is that rect_x is reset back to 50 each time through the loop. To fix this problem, move the initialization of rect_x up outside of the loop. This next section of code will successfully slide the rectangle to the right.
# Starting x position of the rectangle
# Note how this is outside the main while loop.
rect_x = 50

# -------- Main Program Loop -----------
while not done:
	for event in pygame.event.get(): # User did something
		if event.type == pygame.QUIT: # If user clicked close
			done = True # Flag that we are done so we exit this loop

	# Set the screen background
	screen.fill(BLACK)

	pygame.draw.rect(screen, WHITE, [rect_x, 50, 50, 50])
	rect_x += 1
To move the box faster, rather than increasing rect_x by 1, increase it by 5:
rect_x += 5
We can expand this code and increase both x and y, causing the square to move both down and right:
# Starting position of the rectangle
rect_x = 50
rect_y = 50

# -------- Main Program Loop -----------
while not done:
	for event in pygame.event.get():
		if event.type == pygame.QUIT:
			done = True

	# Set the screen background
	screen.fill(BLACK)

	# Draw the rectangle
	pygame.draw.rect(screen, WHITE, [rect_x, rect_y, 50, 50])

	# Move the rectangle starting point
	rect_x += 5
	rect_y += 5
The direction and speed of the box's movement can be stored in a vector. This makes it easy for the direction and speed of a moving object to be changed. The next bit of code shows using variables to store the x and y change of (5, 5).
# Starting position of the rectangle
rect_x = 50
rect_y = 50

# Speed and direction of rectangle
rect_change_x = 5
rect_change_y = 5

# -------- Main Program Loop -----------
while done == False:
	for event in pygame.event.get(): # User did something
		if event.type == pygame.QUIT: # If user clicked close
			done = True # Flag that we are done so we exit this loop

	# Set the screen background
	screen.fill(BLACK)

	# Draw the rectangle
	pygame.draw.rect(screen, WHITE, [rect_x, rect_y, 50, 50])

	# Move the rectangle starting point
	rect_x += rect_change_x
	rect_y += rect_change_y
Once the box hits the edge of the screen it will keep going. Nothing makes the rectangle bounce off the edge of the screen. To reverse the direction so the rectangle travels towards the right, rect_change_y needs to change from 5 to -5 once the rectangle gets to the bottom side of the screen. The rectangle is at the bottom when rect_y is greater than the height of the screen. The code below can do the check and reverse the direction:
# Bounce the rectangle if needed
if rect_y > 450:
	rect_change_y = rect_change_y * -1
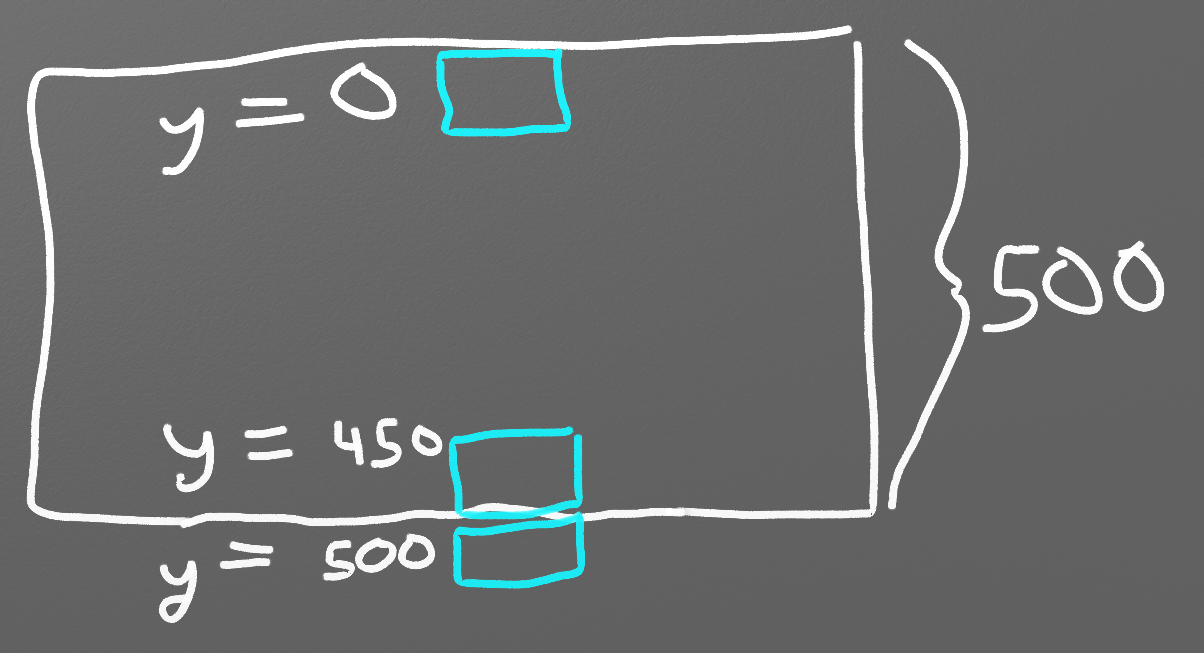
Why check rect_y against 450? If the screen is 500 pixels high, then checking against 500 would be a logical first guess. But remember the rectangle is drawn starting from the top left corner of the rectangle. If the rectangle was drawn starting at 500, it would draw from 500 to 550, totally off screen before it bounced. See Figure 8.1.
Taking into account
that the rectangle is 50 pixels high the correct bounce location is:
$500-50=450$.
The code below will bounce the rectangle off all four sides of a 700x400 window:
# Bounce the rectangle if needed
if rect_y > 450 or rect_y < 0:
	rect_change_y = rect_change_y * -1
if rect_x > 650 or rect_x < 0:
	rect_change_x = rect_change_x * -1
Interested in a more complex shape than a rectangle?
Several drawing commands can be used based off the rect_x and rect_y.
The code below
draws a red rectangle inside the white rectangle. The red rectangle is offset 10 pixels
in the x,y directions from the upper left corner of the white rectangle. It also
is 20 pixels smaller in both dimensions, resulting in 10 pixels of white surrounding
the red rectangle. See Figure 8.2.
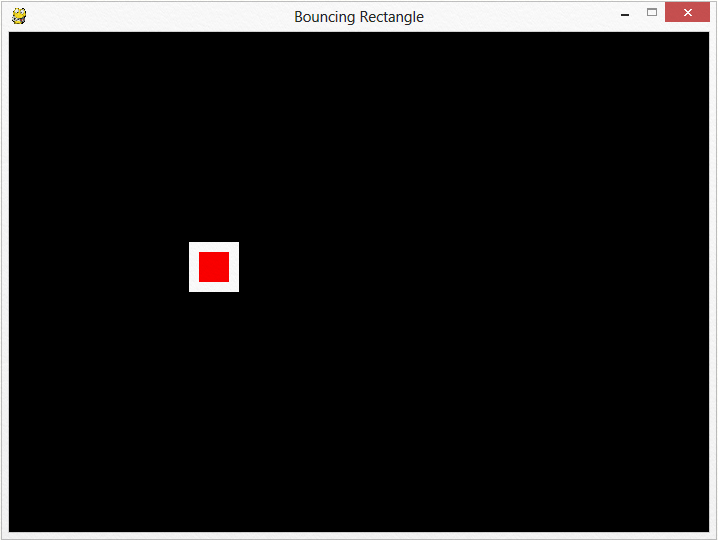
# Draw a red rectangle inside the white one
pygame.draw.rect(screen, WHITE, [rect_x, rect_y, 50, 50])
pygame.draw.rect(screen, RED, [rect_x + 10, rect_y + 10 ,30, 30])
8.2 Animating Snow
Animating only one item isn't enough? Need to animate more? How about being able to animate hundreds of objects at once? This shows how to use techniques from Section 8.1 to animate many snowflakes falling.
8.2.1 Code Explanation
To start this program, begin with the base pygame template that opens
up a blank screen. Again, source for pygame_base_template.py can be found here:
ProgramArcadeGames.com/python_examples/f.php?file=pygame_base_template.py
It is possible to create x, y locations for things like stars, snow, or rain by using random numbers. The simplest way to attempt this is using a for loop to draw circles in random x, y positions. Try the following code inside of the main while loop.
for i in range(50):
    x = random.randrange(0, 400)
    y = random.randrange(0, 400)
	pygame.draw.circle(screen, WHITE, [x, y], 2)
Try it, this program has an odd problem! Twenty times per second, each time through the loop, it draws the show in new random locations. Try adjusting the snow flake count and see how it changes the image.
Obviously, we need to randomly position the snow flakes and keep them in the same spot. We don't want to generate new positions twenty times per second. We need to to keep a list of where they are. The program can use a python list to do this. This should be done before the main loop, otherwise the program will add 50 new snow flakes to the list every 1/20th of a second.
for i in range(50):
    x = random.randrange(0, 400)
    y = random.randrange(0, 400)
    snow_list.append([x, y])
Once the snow flake locations have been added, they can be accessed like a normal list. The following code would print both the x and y coordinates of the first location, stored in position zero:
print(snow_list[0])
What if we wanted just the x or y coordinate? We have lists inside lists. The main list has all the coordinates. Inside of that list, each coordinate is a list of an x (position 0), and a y coordinate (position 1). For example, here are three coordinates:
[[34, 10],
 [10, 50],
 [20, 18]]
To print the y coordinate at position 0, first select coordinate 0, and then the y value at position 1. The code will look like:
print(snow_list[0][1])
To print the x value of the 21st coordinate (position 20), first select coordinate 20, and then the x value at position 0:
print(snow_list[20][0])
Inside of the main while loop, a program may use a for loop to draw each of the items in the snow list. Remember, len(snow_list) will return the number of elements in the snow flake list.
# Process each snow flake in the list
for i in range(len(snow_list)):
	# Draw the snow flake
	pygame.draw.circle(screen, WHITE, snow_list[i], 2)
Remember, there are two types of for loops. The other type of loop can be used, and it would look like:
# Process A COPY of each snow flake's location in the list
for xy_coord in snow_list:
	# Draw the snow flake
	pygame.draw.circle(screen, WHITE, xy_coord, 2)
However, because we plan on modifying the snow flake's location we can't use this type of for loop because we'd be modifying the location of a copy of the snow flake's location rather than the actual snow flake's location.
If the program is to have all the objects in the array move down, like snow, then expanding the for loop created above will cause the y coordinate to increase:
# Process each snow flake in the list
for i in range(len(snow_list)):

	# Draw the snow flake
	pygame.draw.circle(screen, WHITE, snow_list[i], 2)

	# Move the snow flake down one pixel
	snow_list[i][1] += 1
This moves the snow downwards, but once off the screen nothing new appears. By adding the code below, the snow will reset to the top of the screen in a random location:
	# If the snow flake has moved off the bottom of the screen
	if snow_list[i][1] > 400:
		# Reset it just above the top
		y = random.randrange(-50, -10)
		snow_list[i][1] = y
		# Give it a new x position
		x = random.randrange(0, 400)
		snow_list[i][0] = x
It is also possible to add things to the list and have different sizes, shapes, colors, speeds and directions for each item on the screen. This gets complex however because of the multiple types of data that need to be kept in the list. We will keep it simple for now, but once we learn about “classes” in Chapter 12 it will be easy to manage many different attributes for multiple objects.
8.2.2 Full Program Listing
"""
 Animating multiple objects using a list.
 Sample Python/Pygame Programs
 Simpson College Computer Science
 http://programarcadegames.com/
 http://simpson.edu/computer-science/

 Explanation video: http://youtu.be/Gkhz3FuhGoI
"""

# Import a library of functions called 'pygame'
import pygame
import random

# Initialize the game engine
pygame.init()

BLACK = [0, 0, 0]
WHITE = [255, 255, 255]

# Set the height and width of the screen
SIZE = [400, 400]

screen = pygame.display.set_mode(SIZE)
pygame.display.set_caption("Snow Animation")

# Create an empty array
snow_list = []

# Loop 50 times and add a snow flake in a random x,y position
for i in range(50):
    x = random.randrange(0, 400)
    y = random.randrange(0, 400)
    snow_list.append([x, y])

clock = pygame.time.Clock()

# Loop until the user clicks the close button.
done = False
while not done:

    for event in pygame.event.get():   # User did something
        if event.type == pygame.QUIT:  # If user clicked close
            done = True   # Flag that we are done so we exit this loop

    # Set the screen background
    screen.fill(BLACK)

    # Process each snow flake in the list
    for i in range(len(snow_list)):

        # Draw the snow flake
        pygame.draw.circle(screen, WHITE, snow_list[i], 2)

        # Move the snow flake down one pixel
        snow_list[i][1] += 1

        # If the snow flake has moved off the bottom of the screen
        if snow_list[i][1] > 400:
            # Reset it just above the top
            y = random.randrange(-50, -10)
            snow_list[i][1] = y
            # Give it a new x position
            x = random.randrange(0, 400)
            snow_list[i][0] = x

    # Go ahead and update the screen with what we've drawn.
    pygame.display.flip()
    clock.tick(20)

# Be IDLE friendly. If you forget this line, the program will 'hang'
# on exit.
pygame.quit()
This example shows each snowflake moving the same direction. What if each item needs to be animated separately, with its own direction? If you need this for your game, see Chapter 12 on how to use classes. Lab 8 steps you through how to have hundreds of different items animated, each with their own direction.
8.3 3D Animation
Extending from a 2D environment into a 3D environment complete with game physics isn't as hard as it would seem. While it is beyond the scope of this class, it is worth while to see how it is done.
There is a freely available 3D program called Blender which has
a “game engine” that allows programmers to create 3D games. The 3D
objects in the game can have Python code attached to them that controls
their actions in the game.
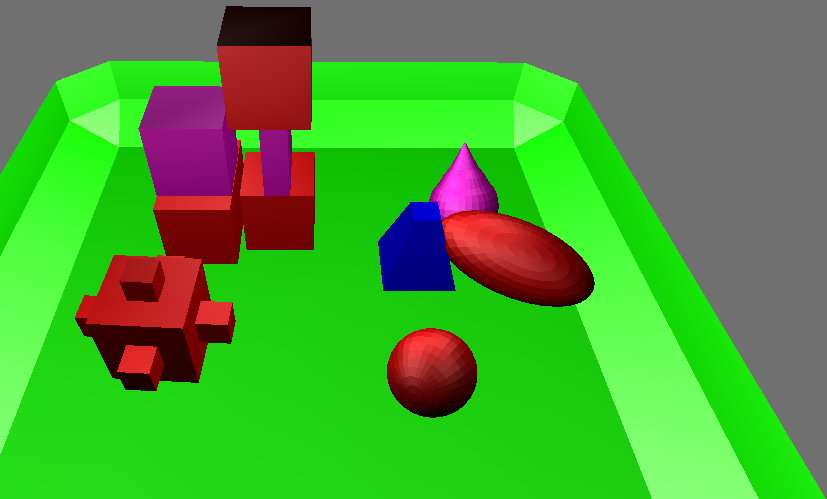
Look at Figure 8.3. This shows a green tray with several objects in it. The blue object is controlled by a Python script that moves it around the tray bumping into the other objects. The script, shown below, has many of the same features that the 2D programs have. There is a main loop, there is a list for x,y locations, and there are variables controlling the vector.
The main program loop is controlled by Blender. The python code shown in the listing is called by Blender for each “frame” the game renders. This is why the Python code does not show a main program loop. It does exist however.
The blue object has a location held in x,y,z format. It can be accessed and changed by using the blue_object.position variable. Array position 0 holds x, position 1 holds y, and position 2 holds the z location.
Rather than the change_x and change_y variables used
in the 2D examples in this changer, this Blender example uses the associative array
locations:
blue_object["x_change"]
blue_object["y_change"]
The if statements check to see if the blue object has reached the borders of the screen and the direction needs to reverse. Unlike pixels used in the 2D games, locations of objects may be a floating point number type. To position an item between 5 and 6, setting its location to 5.5 is permissable.
# Import Blender Game Engine
import bge

# Get a reference to the blue object
cont = bge.logic.getCurrentController()
blue_object = cont.owner

# Print the x,y coordinates where the blue object is
print(blue_object.position[0], blue_object.position[1] )

# Change x,y coordinates according to x_change and
# y_change. x_change and y_change are game properties
# associated with the blue object.
blue_object.position[0] += blue_object["x_change"]
blue_object.position[1] += blue_object["y_change"]

# Check to see of the object has gone to the edge.
# If so reverse direction. Do so with all 4 edges.
if blue_object.position[0] > 6 and blue_object["x_change"] > 0:
    blue_object["x_change"] *= -1

if blue_object.position[0] < -6 and blue_object["x_change"] < 0:
    blue_object["x_change"] *= -1

if blue_object.position[1] > 6 and blue_object["y_change"] > 0:
    blue_object["y_change"] *= -1

if blue_object.position[1] < -6 and blue_object["y_change"] < 0:
    blue_object["y_change"] *= -1
Blender may be downloaded from:
http://www.blender.org/
A full blender example file is available at:
ProgramArcadeGames.com/chapters/08_intro_to_animation/simple_block_move.blend.
8.4 Review
8.4.1 Multiple Choice Quiz
Click here for a multiple-choice quiz.
8.4.2 Short Answer Worksheet
Click here for the chapter worksheet.
8.4.3 Lab
Click here for the chapter lab.
English version by Paul Vincent Craven
Spanish version by Antonio Rodríguez Verdugo
Russian version by Vladimir Slav
Turkish version by Güray Yildirim
Portuguese version by Armando Marques Sobrinho and Tati Carvalho
Dutch version by Frank Waegeman
Hungarian version by Nagy Attila
Finnish version by Jouko Järvenpää
French version by Franco Rossi
Korean version by Kim Zeung-Il
Chinese version by Kai Lin