Program Arcade GamesWith Python And Pygame
Chapter 10: Controllers and Graphics
How do we get objects to move using the keyboard, mouse, or a game controller?
10.1 Introduction
So far, we've shown how to animate items on the screen, but not how to interact with them. How do we use a mouse, keyboard, or game controller to control the action on-screen? Thankfully this is pretty easy.
To begin with, it is necessary to have an object that can be moved around the
screen. The best way to do this is to have a function that takes in an
x and y coordinate, then draws an object at that location. So back to Chapter
9! Let's take a look at how to write a function to draw an object.
All the Pygame draw functions require a screen parameter to let Pygame know which window to draw on. We will need to pass this in to any function we create to draw an object on the screen.
The function also needs to know where to draw the object on the screen. The function needs an x and y. We pass the location to the function as a parameter. Here is example code that defines a function that will draw a snowman when called:
def draw_snowman(screen, x, y):
    # Draw a circle for the head
    pygame.draw.ellipse(screen, WHITE, [35 + x, y, 25, 25])
    # Draw the middle snowman circle
    pygame.draw.ellipse(screen, WHITE, [23 + x, 20 + y, 50, 50])
    # Draw the bottom snowman circle
    pygame.draw.ellipse(screen, WHITE, [x, 65 + y, 100, 100])
Then, in the main program loop, multiple snowmen can be drawn, as
seen in Figure 10.1.

# Snowman in upper left
draw_snowman(screen, 10, 10)

# Snowman in upper right
draw_snowman(screen, 300, 10)

# Snowman in lower left
draw_snowman(screen, 10, 300)
A full working example is available on-line at:
ProgramArcadeGames.com/python_examples/f.php?file=functions_and_graphics.py
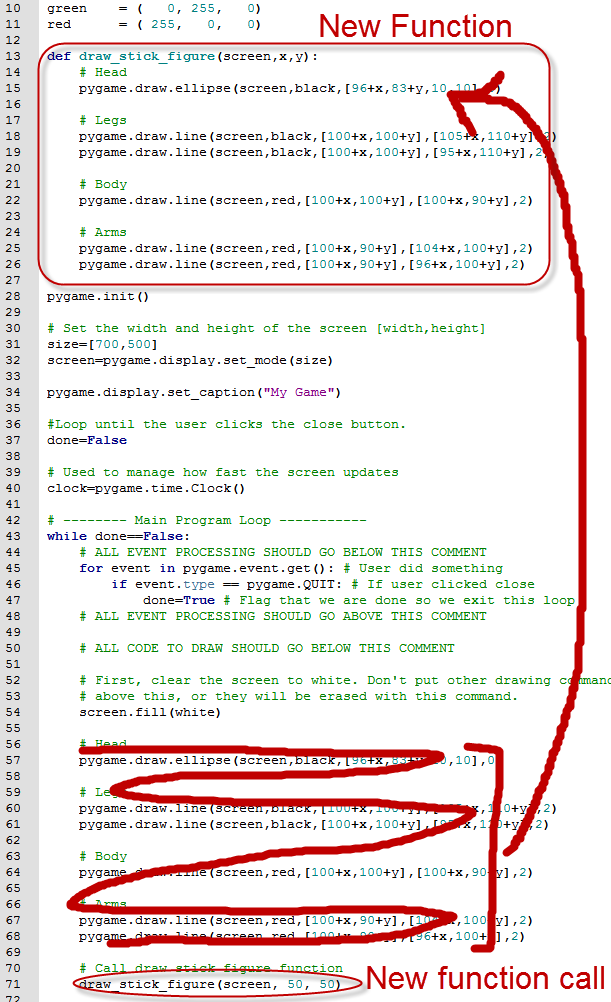
Chances are, from a prior lab you already have a code that draws something cool. But how do you get that into a function? Let's take an example of code that draws a stick figure:
# Head
pygame.draw.ellipse(screen, BLACK, [96,83,10,10], 0)

# Legs
pygame.draw.line(screen, BLACK, [100,100], [105,110], 2)
pygame.draw.line(screen, BLACK, [100,100], [95,110], 2)

# Body
pygame.draw.line(screen, RED, [100,100], [100,90], 2)

# Arms
pygame.draw.line(screen, RED, [100,90], [104,100], 2)
pygame.draw.line(screen, RED, [100,90], [96,100], 2)
This code can easily be put in a function by adding a function def and indenting the code under it. We'll need to bring in all the data that the function needs to draw the stick figure. We need the screen variable to tell the function what window to draw on, and an x and y coordinate for where to draw the stick figure.
But we can't define the function in the middle of our program loop! The code should be removed from the main part of the program. Function declarations should go at the start of the program. We need to move that code to the top. See Figure 10.3 to help visualize.
def draw_stick_figure(screen,x,y):
    # Head
    pygame.draw.ellipse(screen, BLACK, [96,83,10,10], 0)

    # Legs
    pygame.draw.line(screen, BLACK, [100,100], [105,110], 2)
    pygame.draw.line(screen, BLACK, [100,100], [95,110], 2)

    # Body
    pygame.draw.line(screen, RED, [100,100], [100,90], 2)

    # Arms
    pygame.draw.line(screen, RED, [100,90], [104,100], 2)
    pygame.draw.line(screen, RED, [100,90], [96,100], 2)
Right now, this code takes in an x and y coordinate. Unfortunately it doesn't actually do anything with them. You can specify any coordinate you want, the stick figure always draws in in the same exact spot. Not very useful. The next code example literally adds in the x and y coordinate to the code we had before.
def draw_stick_figure(screen, x, y):
    # Head
    pygame.draw.ellipse(screen, BLACK,[96+x,83+y,10,10],0)

    # Legs
    pygame.draw.line(screen, BLACK, [100+x,100+y], [105+x,110+y], 2)
    pygame.draw.line(screen, BLACK, [100+x,100+y], [95+x,110+y], 2)

    # Body
    pygame.draw.line(screen, RED, [100+x,100+y], [100+x,90+y], 2)

    # Arms
    pygame.draw.line(screen, RED, [100+x,90+y], [104+x,100+y], 2)
    pygame.draw.line(screen, RED, [100+x,90+y], [96+x,100+y], 2)
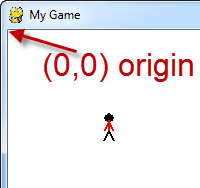
But the problem is that the figure is already drawn a certain distance from the
origin. It assumes an origin of (0, 0) and draws the stick figure down and over about
100 pixels. See Figure 10.4 and how the stick
figure is not drawn at the (0, 0) coordinate passed in.
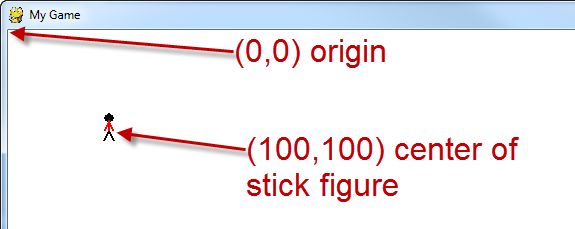
By adding x and y in the function, we shift the origin of the stick figure by that amount. For example, if we call:
draw_stick_figure(screen, 50, 50)
The code does not put a stick figure at (50, 50). It shifts the origin down and
over 50 pixels. Since our stick figure was already being drawn at about (100, 100),
with the origin shift the figure is about (150, 150). How do we fix this so that
the figure is actually drawn where the function call requests?
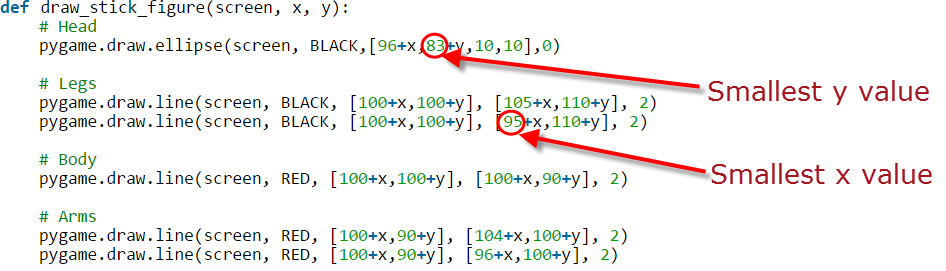
Find the smallest x value, and the smallest y value as shown in Figure 10.5. Then subtract that value from each x and y in the function. Don't mess with the height and width values. Here's an example where we subtracted the smallest x and y values:
def draw_stick_figure(screen, x, y):
    # Head
    pygame.draw.ellipse(screen, BLACK,[96-95+x,83-83+y,10,10],0)

    # Legs
    pygame.draw.line(screen, BLACK, [100-95+x,100-83+y], [105-95+x,110-83+y], 2)
    pygame.draw.line(screen, BLACK, [100-95+x,100-83+y], [95-95+x,110-83+y], 2)

    # Body
    pygame.draw.line(screen, RED, [100-95+x,100-83+y], [100-95+x,90-83+y], 2)

    # Arms
    pygame.draw.line(screen, RED, [100-95+x,90-83+y], [104-95+x,100-83+y], 2)
    pygame.draw.line(screen, RED, [100-95+x,90-83+y], [96-95+x,100-83+y], 2)
Or, to make a program simpler, do the subtraction yourself:
def draw_stick_figure(screen, x, y):
    # Head
    pygame.draw.ellipse(screen, BLACK, [1+x,y,10,10], 0)

    # Legs
    pygame.draw.line(screen, BLACK ,[5+x,17+y], [10+x,27+y], 2)
    pygame.draw.line(screen, BLACK, [5+x,17+y], [x,27+y], 2)

    # Body
    pygame.draw.line(screen, RED, [5+x,17+y], [5+x,7+y], 2)

    # Arms
    pygame.draw.line(screen, RED, [5+x,7+y], [9+x,17+y], 2)
    pygame.draw.line(screen, RED, [5+x,7+y], [1+x,17+y], 2)
10.2 Mouse
Great, now we know how to write a function to draw an object at specific coordinates. How do we get those coordinates? The easiest to work with is the mouse. It takes one line of code to get the coordinates:
pos = pygame.mouse.get_pos()
The trick is that coordinates are returned as a list, or more specifically
a non-modifiable tuple. Both the x and y values are stored in the same variable.
So if we do a print(pos) we get what is
shown in Figure 10.6.
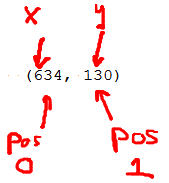
The variable pos is a tuple of two numbers. The x coordinate is in position 0 of array and the y coordinate is in the position 1. These can easily be fetched out and passed to the function that draws the item:
# Game logic
pos = pygame.mouse.get_pos()
x = pos[0]
y = pos[1]

# Drawing section
draw_stick_figure(screen, x, y)
Getting the mouse should go in the “game logic” part of the main program loop. The function call should go in the “drawing” part of the main program loop.
The only problem with this is that the mouse pointer
draws right on top of the stick figure,
making it hard to see, as shown in Figure 10.7.

The mouse can be hidden by using the following code right before the main program loop:
# Hide the mouse cursor
pygame.mouse.set_visible(False)
A full working example can be found here:
ProgramArcadeGames.com/python_examples/f.php?file=move_mouse.py
10.3 Keyboard
Controlling with the keyboard is a bit more complex. We can't just grab the x and y from the mouse. The keyboard doesn't give us an x and y. We need to:
- Create an initial x and y for our start position.
- Set a “velocity” in pixels per frame when an arrow key is pressed down. (keydown)
- Reset the velocity to zero when an arrow key is released. (keyup)
- Adjust the x and y each frame depending on the velocity.
It seems complex, but this is just like the bouncing rectangle we did before, with the exception that the speed is controlled by the keyboard.
To start with, set the location and speed before the main loop starts:
# Speed in pixels per frame
x_speed = 0
y_speed = 0

# Current position
x_coord = 10
y_coord = 10
Inside the main while loop of the program, we need to add some items to our event processing loop. In addition to looking for a pygame.QUIT event, the program needs to look for keyboard events. An event is generated each time the user presses a key.
A pygame.KEYDOWN event is generated when a key is pressed down. A pygame.KEYUP event is generated when the user lets up on a key. When the user presses a key, the speed vector is set to 3 or -3 pixels per frame. When the user lets up on a key the speed vector is reset back to zero. Finally, the coordinates of the object are adjusted by the vector, and then the object is drawn. See the code example below:
for event in pygame.event.get():
    if event.type == pygame.QUIT:
        done = True

    # User pressed down on a key
    elif event.type == pygame.KEYDOWN:
        # Figure out if it was an arrow key. If so
        # adjust speed.
        if event.key == pygame.K_LEFT:
            x_speed = -3
        elif event.key == pygame.K_RIGHT:
            x_speed = 3
        elif event.key == pygame.K_UP:
            y_speed = -3
        elif event.key == pygame.K_DOWN:
            y_speed = 3

    # User let up on a key
    elif event.type == pygame.KEYUP:
        # If it is an arrow key, reset vector back to zero
        if event.key == pygame.K_LEFT or event.key == pygame.K_RIGHT:
            x_speed = 0
        elif event.key == pygame.K_UP or event.key == pygame.K_DOWN:
            y_speed = 0

# Move the object according to the speed vector.
x_coord += x_speed
y_coord += y_speed

# Draw the stick figure
draw_stick_figure(screen, x_coord, y_coord)
For a full example see:
ProgramArcadeGames.com/python_examples/f.php?file=move_keyboard.py
Note that this example does not prevent the character from moving off the edge of the screen. To do this, in the game logic section, a set of if statements would be needed to check the x_coord and y_coord values. If they are outside the boundaries of the screen, then reset the coordinates to the edge. The exact code for this is left as an exercise for the reader.
The table below shows a full list of key-codes that can be used in Pygame:
| Pygame Code | ASCII | Common Name |
|---|---|---|
| K_BACKSPACE | \b | backspace |
| K_RETURN | \r | return |
| K_TAB | \t | tab |
| K_ESCAPE | ^[ | escape |
| K_SPACE | space | |
| K_COMMA | , | comma sign |
| K_MINUS | - | minus |
| K_PERIOD | . | period slash |
| K_SLASH | / | forward |
| K_0 | 0 | 0 |
| K_1 | 1 | 1 |
| K_2 | 2 | 2 |
| K_3 | 3 | 3 |
| K_4 | 4 | 4 |
| K_5 | 5 | 5 |
| K_6 | 6 | 6 |
| K_7 | 7 | 7 |
| K_8 | 8 | 8 |
| K_9 | 9 | 9 |
| K_SEMICOLON | ; | semicolon sign |
| K_EQUALS | = | equals sign |
| K_LEFTBRACKET | [ | left |
| K_RIGHTBRACKET | ] | right |
| K_BACKSLASH | \ | backslash bracket |
| K_BACKQUOTE | ` | grave |
| K_a | a | a |
| K_b | b | b |
| K_c | c | c |
| K_d | d | d |
| K_e | e | e |
| K_f | f | f |
| K_g | g | g |
| K_h | h | h |
| K_i | i | i |
| K_j | j | j |
| K_k | k | k |
| K_l | l | l |
| K_m | m | m |
| K_n | n | n |
| K_o | o | o |
| K_p | p | p |
| K_q | q | q |
| K_r | r | r |
| K_s | s | s |
| K_t | t | t |
| K_u | u | u |
| K_v | v | v |
| K_w | w | w |
| K_x | x | x |
| K_y | y | y |
| K_z | z | z |
| K_DELETE | delete | |
| K_KP0 | keypad | 0 |
| K_KP1 | keypad | 1 |
| K_KP2 | keypad | 2 |
| K_KP3 | keypad | 3 |
| K_KP4 | keypad | 4 |
| K_KP5 | keypad | 5 |
| K_KP6 | keypad | 6 |
| K_KP7 | keypad | 7 |
| K_KP8 | keypad | 8 |
| K_KP9 | keypad | 9 period |
| K_KP_PERIOD | . | keypad divide |
| K_KP_DIVIDE | / | keypad multiply |
| K_KP_MULTIPLY | * | keypad minus |
| K_KP_MINUS | - | keypad plus |
| K_KP_PLUS | + | keypad enter |
| K_KP_ENTER | \r | keypad equals |
| K_KP_EQUALS | = | keypad |
| K_UP | up | arrow |
| K_DOWN | down | arrow |
| K_RIGHT | right | arrow |
| K_LEFT | left | arrow |
| K_INSERT | insert | |
| K_HOME | home | |
| K_END | end | |
| K_PAGEUP | page | up |
| K_PAGEDOWN | page | down |
| K_F1 | F1 | |
| K_F2 | F2 | |
| K_F3 | F3 | |
| K_F4 | F4 | |
| K_F5 | F5 | |
| K_F6 | F6 | |
| K_F7 | F7 | |
| K_F8 | F8 | |
| K_F9 | F9 | |
| K_F10 | F10 | |
| K_F11 | F11 | |
| K_F12 | F12 | |
| K_NUMLOCK | numlock | |
| K_CAPSLOCK | capslock | |
| K_RSHIFT | right | shift |
| K_LSHIFT | left | shift |
| K_RCTRL | right | ctrl |
| K_LCTRL | left | ctrl |
| K_RALT | right | alt |
| K_LALT | left | alt |
10.4 Game Controller
Game controllers require a different set of code, but the idea is still simple.
To begin, check to see if the computer has a joystick, and initialize it before use. This should only be done once. Do it ahead of the main program loop:
# Current position
x_coord = 10
y_coord = 10

# Count the joysticks the computer has
joystick_count = pygame.joystick.get_count()
if joystick_count == 0:
    # No joysticks!
    print("Error, I didn't find any joysticks.")
else:
    # Use joystick #0 and initialize it
    my_joystick = pygame.joystick.Joystick(0)
    my_joystick.init()
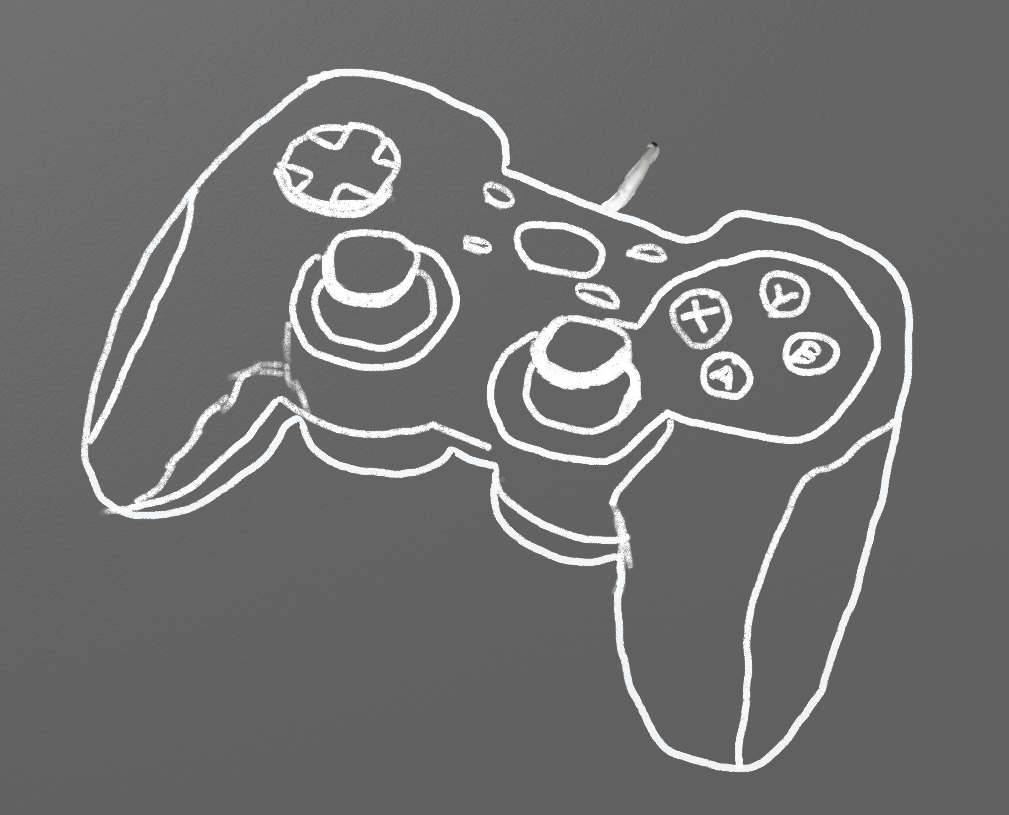
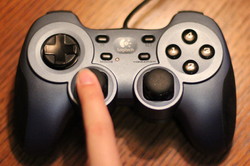
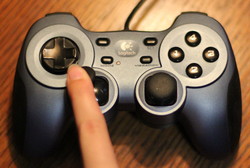
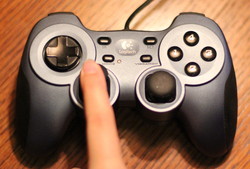
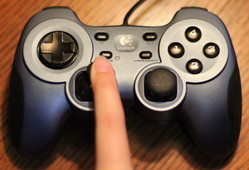
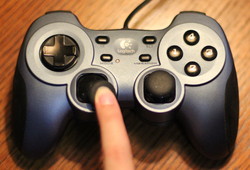
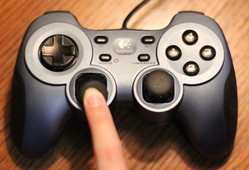
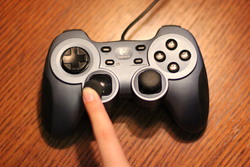
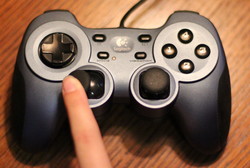
A joystick will return two floating point values. If the joystick is perfectly centered
it will return (0, 0). If the joystick is fully up and to the left it will return
(-1, -1). If the joystick is down and to the right it will return (1, 1). If the joystick
is somewhere in between, values are scaled accordingly. See the controller
images starting at
Figure 10.8 to get
an idea how it works.

Inside the main program loop, the values of the joystick returns may be multiplied according to how far an object should move. In the case of the code below, moving the joystick fully in a direction will move it 10 pixels per frame because the joystick values are multiplied by 10.
# This goes in the main program loop!

# As long as there is a joystick
if joystick_count != 0:

    # This gets the position of the axis on the game controller
    # It returns a number between -1.0 and +1.0
    horiz_axis_pos = my_joystick.get_axis(0)
    vert_axis_pos = my_joystick.get_axis(1)

    # Move x according to the axis. We multiply by 10 to speed up the movement.
    # Convert to an integer because we can't draw at pixel 3.5, just 3 or 4.
    x_coord = x_coord + int(horiz_axis_pos * 10)
    y_coord = y_coord + int(vert_axis_pos * 10)

# Clear the screen
screen.fill(WHITE)

# Draw the item at the proper coordinates
draw_stick_figure(screen, x_coord, y_coord)
For a full example, see
ProgramArcadeGames.com/python_examples/f.php?file=move_game_controller.py.
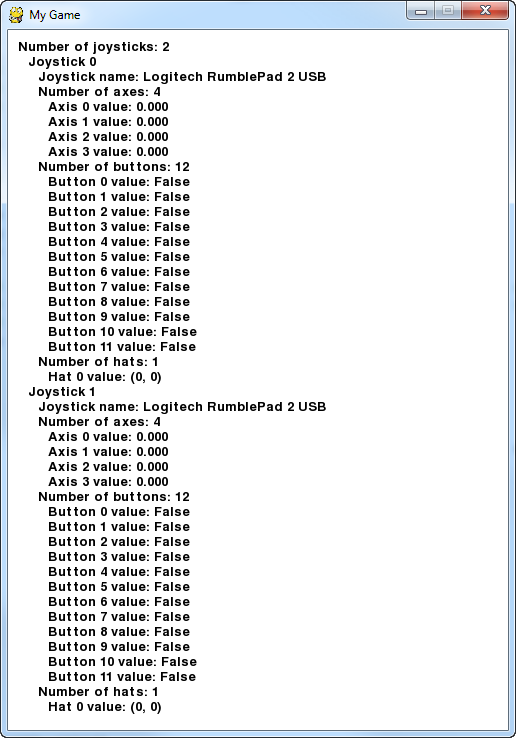
Controllers have a lot of joysticks, buttons, and even “hat” switches. Below is
an example program and screenshot that prints everything to the screen showing
what each game controller is doing. Take heed that game controllers must be plugged in before
this program starts, or the program can't detect them.
"""
Sample Python/Pygame Programs
Simpson College Computer Science
http://programarcadegames.com/
http://simpson.edu/computer-science/

Show everything we can pull off the joystick
"""
import pygame

# Define some colors
BLACK = (0, 0, 0)
WHITE = (255, 255, 255)


class TextPrint(object):
    """
    This is a simple class that will help us print to the screen
    It has nothing to do with the joysticks, just outputting the
    information.
    """
    def __init__(self):
        """ Constructor """
        self.reset()
        self.x_pos = 10
        self.y_pos = 10
        self.font = pygame.font.Font(None, 20)

    def print(self, my_screen, text_string):
        """ Draw text onto the screen. """
        text_bitmap = self.font.render(text_string, True, BLACK)
        my_screen.blit(text_bitmap, [self.x_pos, self.y_pos])
        self.y_pos += self.line_height

    def reset(self):
        """ Reset text to the top of the screen. """
        self.x_pos = 10
        self.y_pos = 10
        self.line_height = 15

    def indent(self):
        """ Indent the next line of text """
        self.x_pos += 10

    def unindent(self):
        """ Unindent the next line of text """
        self.x_pos -= 10


pygame.init()

# Set the width and height of the screen [width,height]
size = [500, 700]
screen = pygame.display.set_mode(size)

pygame.display.set_caption("My Game")

# Loop until the user clicks the close button.
done = False

# Used to manage how fast the screen updates
clock = pygame.time.Clock()

# Initialize the joysticks
pygame.joystick.init()

# Get ready to print
textPrint = TextPrint()

# -------- Main Program Loop -----------
while not done:
    # EVENT PROCESSING STEP
    for event in pygame.event.get():
        if event.type == pygame.QUIT:
            done = True

        # Possible joystick actions: JOYAXISMOTION JOYBALLMOTION JOYBUTTONDOWN
        # JOYBUTTONUP JOYHATMOTION
        if event.type == pygame.JOYBUTTONDOWN:
            print("Joystick button pressed.")
        if event.type == pygame.JOYBUTTONUP:
            print("Joystick button released.")

    # DRAWING STEP
    # First, clear the screen to white. Don't put other drawing commands
    # above this, or they will be erased with this command.
    screen.fill(WHITE)
    textPrint.reset()

    # Get count of joysticks
    joystick_count = pygame.joystick.get_count()

    textPrint.print(screen, "Number of joysticks: {}".format(joystick_count))
    textPrint.indent()

    # For each joystick:
    for i in range(joystick_count):
        joystick = pygame.joystick.Joystick(i)
        joystick.init()

        textPrint.print(screen, "Joystick {}".format(i))
        textPrint.indent()

        # Get the name from the OS for the controller/joystick
        name = joystick.get_name()
        textPrint.print(screen, "Joystick name: {}".format(name))

        # Usually axis run in pairs, up/down for one, and left/right for
        # the other.
        axes = joystick.get_numaxes()
        textPrint.print(screen, "Number of axes: {}".format(axes))
        textPrint.indent()

        for i in range(axes):
            axis = joystick.get_axis(i)
            textPrint.print(screen, "Axis {} value: {:>6.3f}".format(i, axis))
        textPrint.unindent()

        buttons = joystick.get_numbuttons()
        textPrint.print(screen, "Number of buttons: {}".format(buttons))
        textPrint.indent()

        for i in range(buttons):
            button = joystick.get_button(i)
            textPrint.print(screen, "Button {:>2} value: {}".format(i, button))
        textPrint.unindent()

        # Hat switch. All or nothing for direction, not like joysticks.
        # Value comes back in an array.
        hats = joystick.get_numhats()
        textPrint.print(screen, "Number of hats: {}".format(hats))
        textPrint.indent()

        for i in range(hats):
            hat = joystick.get_hat(i)
            textPrint.print(screen, "Hat {} value: {}".format(i, str(hat)))
        textPrint.unindent()

        textPrint.unindent()

    # ALL CODE TO DRAW SHOULD GO ABOVE THIS COMMENT

    # Go ahead and update the screen with what we've drawn.
    pygame.display.flip()

    # Limit to 60 frames per second
    clock.tick(60)

# Close the window and quit.
# If you forget this line, the program will 'hang'
# on exit if running from IDLE.
pygame.quit()
10.5 Review
10.5.1 Multiple Choice Quiz
Click here for a multiple-choice quiz.
10.5.2 Short Answer Worksheet
Click here for the chapter worksheet.
10.5.3 Lab
Click here for the chapter lab.
English version by Paul Vincent Craven
Spanish version by Antonio Rodríguez Verdugo
Russian version by Vladimir Slav
Turkish version by Güray Yildirim
Portuguese version by Armando Marques Sobrinho and Tati Carvalho
Dutch version by Frank Waegeman
Hungarian version by Nagy Attila
Finnish version by Jouko Järvenpää
French version by Franco Rossi
Korean version by Kim Zeung-Il
Chinese version by Kai Lin