Program Arcade GamesWith Python And Pygame
Chapter 10: 控制器和图形
我们如何通过使用键盘,鼠标或者游戏手柄来操控物体移动?
10.1 入门
截止目前,我们已经演示国入伙让物体在屏幕上动画化,但是还不知道如何同它们交互。我们如何使用鼠标,键盘或者游戏手柄来可能哦告知屏幕上的行动? 其实很简单。
首先,我们必须让一个物体能够在屏幕上四处移动。
最哈的办法是拥有一个函数function能够接受x,y坐标,然后在那个位置画出物体。
所以寄回到了第9章!
我们来看一下如何写个函数来画物体。
所有的Pygame的画图函数需要一个screen参数来让Pygame知道画在哪个窗口上。我们需要把这个参数传递到任何要在屏幕上砸图的函数。
这个函数也需要知道在屏幕的哪里画出对象。函数需要一个x和一个y。我们以参数的形式把位置传递给函数。 以下的代码定义了一个画雪人的函数:
def draw_snowman(screen, x, y):
    # 画一个圆形作头部
    pygame.draw.ellipse(screen, WHITE, [35+x, 0+y, 25, 25])
    # 画一个圆形作中部
    pygame.draw.ellipse(screen, WHITE, [23+x, 20+y, 50, 50])
    # 画一个圆形作底部
    pygame.draw.ellipse(screen, WHITE, [0+x, 65+y, 100, 100])
然后,在主程序的循环里,多个雪人画了出来,如图所示10.1.

# 左上角的雪人
draw_snowman(screen, 10, 10)

# 右上角的雪人
draw_snowman(screen, 300, 10)

# 左下角的雪人
draw_snowman(screen, 10, 300)
一个完整的例子在这里:
ProgramArcadeGames.com/python_examples/f.php?file=functions_and_graphics.py
可能你在之前的实验里已经有画出很酷的图的代码。你应该如何将它转成一个函数呢 让我们来看一个画火柴人的代码:
# 头
pygame.draw.ellipse(screen, BLACK, [96,83,10,10], 0)

# 腿
pygame.draw.line(screen, BLACK, [100,100], [105,110], 2)
pygame.draw.line(screen, BLACK, [100,100], [95,110], 2)

# 身体
pygame.draw.line(screen, RED, [100,100], [100,90], 2)

# 手臂
pygame.draw.line(screen, RED, [100,90], [104,100], 2)
pygame.draw.line(screen, RED, [100,90], [96,100], 2)
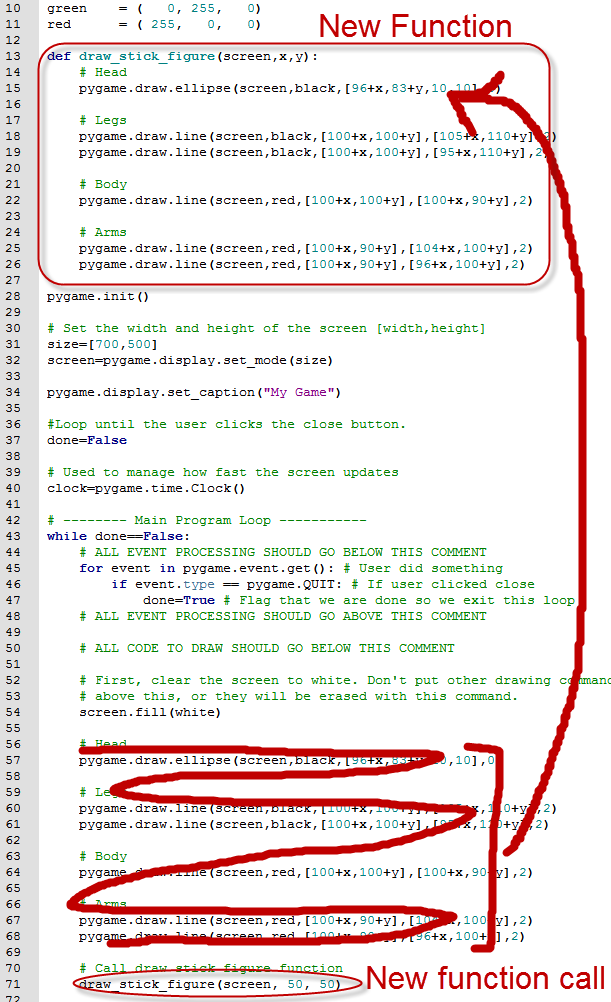
这段代码可以通过添加一个def和缩进来变成一个函数。我们需要引入画出图形所需的所有数据。 我们需要screen变量来告诉函数画在哪个窗口上,还需要一对x,y坐标来告知画的位置。
但是我们不能在我们程序的循环之中定义函数! 代码应该从程序的主要部分里移除。函数的声明应该在程序的开头。 我们需要把代码移到顶端。 参看图例10.3来帮助视觉化地理解。
def draw_stick_figure(screen,x,y):
    # 头
    pygame.draw.ellipse(screen, BLACK, [96,83,10,10], 0)

    # 腿
    pygame.draw.line(screen, BLACK, [100,100], [105,110], 2)
    pygame.draw.line(screen, BLACK, [100,100], [95,110], 2)

    # 身体
    pygame.draw.line(screen, RED, [100,100], [100,90], 2)

    # 手臂
    pygame.draw.line(screen, RED, [100,90], [104,100], 2)
    pygame.draw.line(screen, RED, [100,90], [96,100], 2)
现在,代码取了一个x,y的坐标。不幸地是函数并没有对它做什么。你可以声明任何你想要的坐标,但是火柴人总是被画在 同一个位置。并不是很有用。下面的代码会真正使用到x,y坐标在我们之前的代码基础之上。
def draw_stick_figure(screen, x, y):
    # 头
    pygame.draw.ellipse(screen, BLACK,[96+x,83+y,10,10],0)

    # 腿
    pygame.draw.line(screen, BLACK, [100+x,100+y], [105+x,110+y], 2)
    pygame.draw.line(screen, BLACK, [100+x,100+y], [95+x,110+y], 2)

    # 身体
    pygame.draw.line(screen, RED, [100+x,100+y], [100+x,90+y], 2)

    # 手臂
    pygame.draw.line(screen, RED, [100+x,90+y], [104+x,100+y], 2)
    pygame.draw.line(screen, RED, [100+x,90+y], [96+x,100+y], 2)
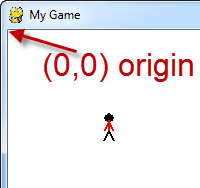
但是问题是现在的火柴人的位置已经和原点有一些距离了。
它假设了原点是(0, 0),然后在向下相距100像素的地方画出了图形。参考图例10.4,它演示了图形并没有在传入的(0, 0)处画出来。
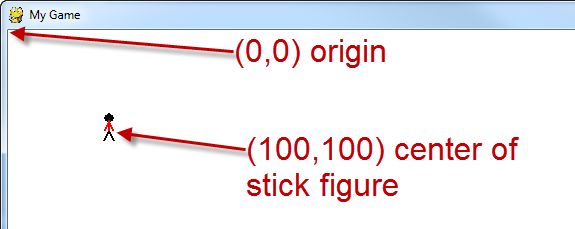
通过在函数里添加x和y,我们把原点挪动了那段距离。例如,如果我们调用:
draw_stick_figure(screen, 50, 50)
代码并没有在(50, 50)出画图。它把原点向右和向下各挪了50像素。我们原来的火柴人就画在(100, 100)处, 现在原点被挪动了,图形现在出现在(150, 150)出。我们该如何改动能把图画在函数调用的位置呢??
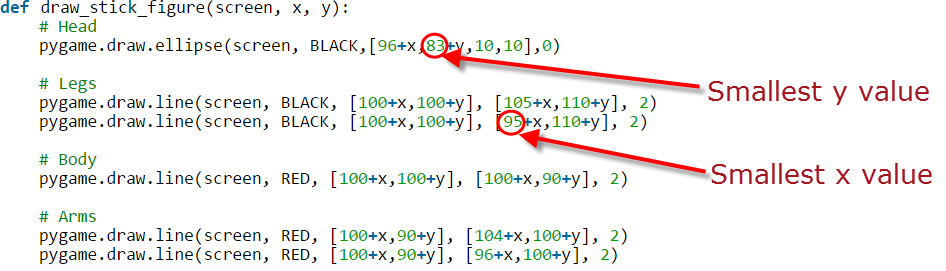
找到x的最小值和y的最小值,如图例所示。10.5。然后在函数里用x和y分别减去这个值。 不要同高度与宽度搞混淆。 这是一个例子:
def draw_stick_figure(screen, x, y):
    # 头
    pygame.draw.ellipse(screen, BLACK,[96-95+x,83-83+y,10,10],0)

    # 腿
    pygame.draw.line(screen, BLACK, [100-95+x,100-83+y], [105-95+x,110-83+y], 2)
    pygame.draw.line(screen, BLACK, [100-95+x,100-83+y], [95-95+x,110-83+y], 2)

    # 身体
    pygame.draw.line(screen, RED, [100-95+x,100-83+y], [100-95+x,90-83+y], 2)

    # 手臂
    pygame.draw.line(screen, RED, [100-95+x,90-83+y], [104-95+x,100-83+y], 2)
    pygame.draw.line(screen, RED, [100-95+x,90-83+y], [96-95+x,100-83+y], 2)
或者,让程序更加简单,你自己来完成减法:
def draw_stick_figure(screen, x, y):
    # 头
    pygame.draw.ellipse(screen, BLACK, [1+x,y,10,10], 0)

    # 腿
    pygame.draw.line(screen, BLACK ,[5+x,17+y], [10+x,27+y], 2)
    pygame.draw.line(screen, BLACK, [5+x,17+y], [x,27+y], 2)

    # 身体
    pygame.draw.line(screen, RED, [5+x,17+y], [5+x,7+y], 2)

    # 手臂
    pygame.draw.line(screen, RED, [5+x,7+y], [9+x,17+y], 2)
    pygame.draw.line(screen, RED, [5+x,7+y], [1+x,17+y], 2)
10.2 鼠标
现在,我们知道如何写一个函数来在指定位置画东西。 我们如何获取那些坐标呢?最简单的办法是用鼠标。取得坐标只需要一行代码:
pos = pygame.mouse.get_pos()
技巧是返回的坐标是一个列表,或更具体地说是一个不可修改的元组。x和y的值存在同一个变量里。
所以如果我们做一个print(pos),我们会得到如图所示10.6.
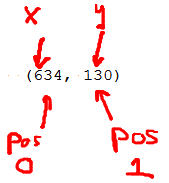
变量pos是一个两个数组成的元组。x坐标在数组的位置0,而y坐标在位置1。它们都可以简单地提取并传递到所需的函数里:
# 游戏逻辑
pos = pygame.mouse.get_pos()
x = pos[0]
y = pos[1]

# 绘图
draw_stick_figure(screen, x, y)
获得鼠标位置的代码,应噶放在主循环中的“游戏逻辑”这一块。 要调用它的函数应该放在“绘图”这一块。
这里唯一的问题是鼠标会停留在图像正上方,难于观察,如图例所示10.7.

鼠标可以通过下面的代码隐藏起来:
# 隐藏鼠标光标
pygame.mouse.set_visible(False)
一个湾真的例子可以在这儿找到完整
ProgramArcadeGames.com/python_examples/f.php?file=move_mouse.py
10.3 键盘
用键盘控制要复杂一些。 我们不能像从鼠标那儿抓取x和y。键盘没法提供x和y。我们需要做的是:
- 创建一个对初始的x和y作为起点。
- 当方向键按下的时候,设置一个每帧的“速度”,以像素表示。
- 当方向键释放的时候,把这个速度重新设为0。
- 根据不同的速度调整每一帧的x,y。
看起来好像很复杂,其实这和我们之前做的反弹矩形很相近,只不过速度是由键盘看哦的。
要开始,我们先在主循环开始之前设置好位置和速度:
# 每一帧的速度
x_speed = 0
y_speed = 0

# 闲杂的位置现在x_coord = 10
y_coord = 10
在程序的主while循环之内,我们需要处理一些事件的操作。 另外,在等待pygame.QUIT事件的时候,程序也需要寻找键盘事件的发生。 每一次按下一个键都会生成一个事件。
一个pygame.KEYDOWN事件是在按键被按下时生澈的。一个pygame.KEYUP事件是当用户离开一个按键的时候生成的。 当用户按下键的时候,速度矢量设置为每帧3或这-3像素。 当用户释放健的时候,速度矢量又重新设为0。 最终,物体的坐标由速度调整,然后被画了出来。 请查看下面的代码:
for event in pygame.event.get():
    if event.type == pygame.QUIT:
        done = True

    # 用户按下了一个键
    if event.type == pygame.KEYDOWN:
        # 判断出是一个方向键,从而调整速度。
        if event.key == pygame.K_LEFT:
            x_speed = -3
        if event.key == pygame.K_RIGHT:
            x_speed = 3
        if event.key == pygame.K_UP:
            y_speed = -3
        if event.key == pygame.K_DOWN:
            y_speed = 3

    # 用户释放了一个键
    if event.type == pygame.KEYUP:
        # 判断出是一个方向键,从而重设速度为0。
        if event.key == pygame.K_LEFT:
            x_speed = 0
        if event.key == pygame.K_RIGHT:
            x_speed = 0
        if event.key == pygame.K_UP:
            y_speed = 0
        if event.key == pygame.K_DOWN:
            y_speed = 0

# 根据速度矢量来移动物体
x_coord += x_speed
y_coord += y_speed

# 画出图像
draw_stick_figure(screen, x_coord, y_coord)
一个完整的例子请看:
ProgramArcadeGames.com/python_examples/f.php?file=move_keyboard.py
请注意这段代码不能阻止物体滑出屏幕边缘。要防止这样,我们需要在游戏逻辑的部分,添加一组if语句来检查x_coord和y_coord的值。 如果它们在屏幕边界外,就重设密码。具体的代码就作为练习留给读者了。
下面的表格展示了Python中所有可以用的键盘对应的代码:
| Pygame码 | ASCII | 常用名称 |
|---|---|---|
| K_BACKSPACE | \b | backspace |
| K_RETURN | \r | return |
| K_TAB | \t | tab |
| K_ESCAPE | ^[ | escape |
| K_SPACE | space | |
| K_COMMA | , | comma sign |
| K_MINUS | - | minus |
| K_PERIOD | . | period slash |
| K_SLASH | / | forward |
| K_0 | 0 | 0 |
| K_1 | 1 | 1 |
| K_2 | 2 | 2 |
| K_3 | 3 | 3 |
| K_4 | 4 | 4 |
| K_5 | 5 | 5 |
| K_6 | 6 | 6 |
| K_7 | 7 | 7 |
| K_8 | 8 | 8 |
| K_9 | 9 | 9 |
| K_SEMICOLON | ; | semicolon sign |
| K_EQUALS | = | equals sign |
| K_LEFTBRACKET | [ | left |
| K_RIGHTBRACKET | ] | right |
| K_BACKSLASH | \ | backslash bracket |
| K_BACKQUOTE | ` | grave |
| K_a | a | a |
| K_b | b | b |
| K_c | c | c |
| K_d | d | d |
| K_e | e | e |
| K_f | f | f |
| K_g | g | g |
| K_h | h | h |
| K_i | i | i |
| K_j | j | j |
| K_k | k | k |
| K_l | l | l |
| K_m | m | m |
| K_n | n | n |
| K_o | o | o |
| K_p | p | p |
| K_q | q | q |
| K_r | r | r |
| K_s | s | s |
| K_t | t | t |
| K_u | u | u |
| K_v | v | v |
| K_w | w | w |
| K_x | x | x |
| K_y | y | y |
| K_z | z | z |
| K_DELETE | delete | |
| K_KP0 | keypad | 0 |
| K_KP1 | keypad | 1 |
| K_KP2 | keypad | 2 |
| K_KP3 | keypad | 3 |
| K_KP4 | keypad | 4 |
| K_KP5 | keypad | 5 |
| K_KP6 | keypad | 6 |
| K_KP7 | keypad | 7 |
| K_KP8 | keypad | 8 |
| K_KP9 | keypad | 9 period |
| K_KP_PERIOD | . | keypad divide |
| K_KP_DIVIDE | / | keypad multiply |
| K_KP_MULTIPLY | * | keypad minus |
| K_KP_MINUS | - | keypad plus |
| K_KP_PLUS | + | keypad enter |
| K_KP_ENTER | \r | keypad equals |
| K_KP_EQUALS | = | keypad |
| K_UP | up | arrow |
| K_DOWN | down | arrow |
| K_RIGHT | right | arrow |
| K_LEFT | left | arrow |
| K_INSERT | insert | |
| K_HOME | home | |
| K_END | end | |
| K_PAGEUP | page | up |
| K_PAGEDOWN | page | down |
| K_F1 | F1 | |
| K_F2 | F2 | |
| K_F3 | F3 | |
| K_F4 | F4 | |
| K_F5 | F5 | |
| K_F6 | F6 | |
| K_F7 | F7 | |
| K_F8 | F8 | |
| K_F9 | F9 | |
| K_F10 | F10 | |
| K_F11 | F11 | |
| K_F12 | F12 | |
| K_NUMLOCK | numlock | |
| K_CAPSLOCK | capslock | |
| K_RSHIFT | right | shift |
| K_LSHIFT | left | shift |
| K_RCTRL | right | ctrl |
| K_LCTRL | left | ctrl |
| K_RALT | right | alt |
| K_LALT | left | alt |
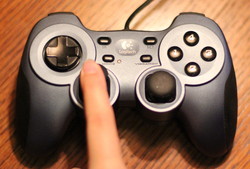
10.4 游戏控制器
游戏鼠标需要一组不同的代码,但是概念仍然是简单的。
首席,要检查计算机是否装有手柄,先启动手柄。这只需要在主循环之前做一次。:
# 现在位置
x_coord = 10
y_coord = 10

# 检查游戏手柄
joystick_count = pygame.joystick.get_count()
if joystick_count == 0:
    # 没检查到游戏手柄!
    print("Error, I didn't find any joysticks.")
else:
    # 使用手柄0并初始化
    my_joystick = pygame.joystick.Joystick(0)
    my_joystick.init()
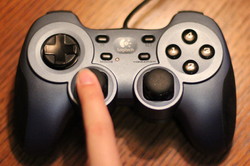
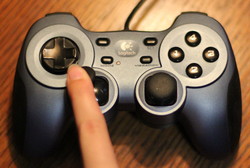
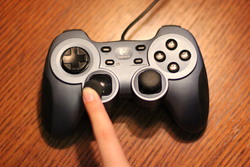
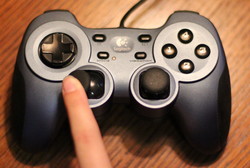
一个游戏手柄会返回两个浮点数。如果手柄位于正中央,返回的值是(0, 0)。
如果手柄在左上角,会返回(-1, -1)。如果手表在右下角,返回(1, 1)。如果在这之间的某个位置,其值会按比例缩放。请参考图例对其工作原理有个大概印象10.8。

在主循环之内,手柄返回的值可能会根据物理移动的距离来做乘法。在下段例子中,手柄的值被乘以了10,所以会以每帧10像素的速度移动手柄。
# 这需在主循环之中

#检查手柄的存在
if joystick_count != 0:

    # 获得手柄的位置
    # 返回一个-1.0 and +1.0之间的值
    horiz_axis_pos = my_joystick.get_axis(0)
    vert_axis_pos = my_joystick.get_axis(1)

    #沿着轴移动x。乘以10来加速。
    # 转化成整数,因为我们不能在像素3.5处画图,要么像素3或是像素4。
    x_coord = x_coord + int(horiz_axis_pos * 10)
    y_coord = y_coord + int(vert_axis_pos * 10)

# 清理屏幕
screen.fill(WHITE)

# 在适当的位置绘图
draw_stick_figure(screen, x_coord, y_coord)
完整的例子,请看
ProgramArcadeGames.com/python_examples/f.php?file=move_game_controller.py.
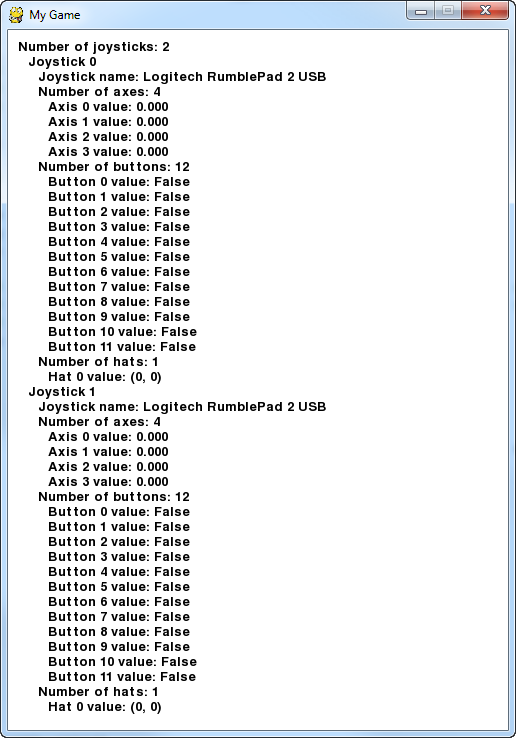
游戏控制器有手柄,按键甚至“帽子”开关。下面的例子和截图,打印出了每个游戏控制器在做什么。请注意游戏控制器必须在程序开始前就插入,否则无法检测到它们。
"""
Sample Python/Pygame Programs
Simpson College Computer Science
http://programarcadegames.com/
http://simpson.edu/computer-science/

Show everything we can pull off the joystick
"""
import pygame

# Define some colors
BLACK = (0, 0, 0)
WHITE = (255, 255, 255)


class TextPrint(object):
    """
    This is a simple class that will help us print to the screen
    It has nothing to do with the joysticks, just outputting the
    information.
    """
    def __init__(self):
        """ Constructor """
        self.reset()
        self.x_pos = 10
        self.y_pos = 10
        self.font = pygame.font.Font(None, 20)

    def print(self, my_screen, text_string):
        """ Draw text onto the screen. """
        text_bitmap = self.font.render(text_string, True, BLACK)
        my_screen.blit(text_bitmap, [self.x_pos, self.y_pos])
        self.y_pos += self.line_height

    def reset(self):
        """ Reset text to the top of the screen. """
        self.x_pos = 10
        self.y_pos = 10
        self.line_height = 15

    def indent(self):
        """ Indent the next line of text """
        self.x_pos += 10

    def unindent(self):
        """ Unindent the next line of text """
        self.x_pos -= 10


pygame.init()

# Set the width and height of the screen [width,height]
size = [500, 700]
screen = pygame.display.set_mode(size)

pygame.display.set_caption("My Game")

# Loop until the user clicks the close button.
done = False

# Used to manage how fast the screen updates
clock = pygame.time.Clock()

# Initialize the joysticks
pygame.joystick.init()

# Get ready to print
textPrint = TextPrint()

# -------- Main Program Loop -----------
while not done:
    # EVENT PROCESSING STEP
    for event in pygame.event.get():
        if event.type == pygame.QUIT:
            done = True

        # Possible joystick actions: JOYAXISMOTION JOYBALLMOTION JOYBUTTONDOWN
        # JOYBUTTONUP JOYHATMOTION
        if event.type == pygame.JOYBUTTONDOWN:
            print("Joystick button pressed.")
        if event.type == pygame.JOYBUTTONUP:
            print("Joystick button released.")

    # DRAWING STEP
    # First, clear the screen to white. Don't put other drawing commands
    # above this, or they will be erased with this command.
    screen.fill(WHITE)
    textPrint.reset()

    # Get count of joysticks
    joystick_count = pygame.joystick.get_count()

    textPrint.print(screen, "Number of joysticks: {}".format(joystick_count))
    textPrint.indent()

    # For each joystick:
    for i in range(joystick_count):
        joystick = pygame.joystick.Joystick(i)
        joystick.init()

        textPrint.print(screen, "Joystick {}".format(i))
        textPrint.indent()

        # Get the name from the OS for the controller/joystick
        name = joystick.get_name()
        textPrint.print(screen, "Joystick name: {}".format(name))

        # Usually axis run in pairs, up/down for one, and left/right for
        # the other.
        axes = joystick.get_numaxes()
        textPrint.print(screen, "Number of axes: {}".format(axes))
        textPrint.indent()

        for i in range(axes):
            axis = joystick.get_axis(i)
            textPrint.print(screen, "Axis {} value: {:>6.3f}".format(i, axis))
        textPrint.unindent()

        buttons = joystick.get_numbuttons()
        textPrint.print(screen, "Number of buttons: {}".format(buttons))
        textPrint.indent()

        for i in range(buttons):
            button = joystick.get_button(i)
            textPrint.print(screen, "Button {:>2} value: {}".format(i, button))
        textPrint.unindent()

        # Hat switch. All or nothing for direction, not like joysticks.
        # Value comes back in an array.
        hats = joystick.get_numhats()
        textPrint.print(screen, "Number of hats: {}".format(hats))
        textPrint.indent()

        for i in range(hats):
            hat = joystick.get_hat(i)
            textPrint.print(screen, "Hat {} value: {}".format(i, str(hat)))
        textPrint.unindent()

        textPrint.unindent()

    # ALL CODE TO DRAW SHOULD GO ABOVE THIS COMMENT

    # Go ahead and update the screen with what we've drawn.
    pygame.display.flip()

    # Limit to 60 frames per second
    clock.tick(60)

# Close the window and quit.
# If you forget this line, the program will 'hang'
# on exit if running from IDLE.
pygame.quit()
10.5 复习
10.5.1 选择题小测验
Click here for a multiple-choice quiz.
10.5.2 练习表
Click here for the chapter worksheet.
10.5.3 实验
Click here for the chapter lab.
English version by Paul Vincent Craven
Spanish version by Antonio Rodríguez Verdugo
Russian version by Vladimir Slav
Turkish version by Güray Yildirim
Portuguese version by Armando Marques Sobrinho and Tati Carvalho
Dutch version by Frank Waegeman
Hungarian version by Nagy Attila
Finnish version by Jouko Järvenpää
French version by Franco Rossi
Korean version by Kim Zeung-Il
Chinese version by Kai Lin